Data Science Portfolio Projects (Part I)
Introduction
Introduction I’ve hired a lot of data scientists over my career and the number one thing I look for is tangible complete projects. Individuals who build real projects that we can explore together are above and beyond other candidates. I’m also surprised by how few people make projects that are accessible and useable. I can’t speak for other people, but for myself at least, I find that projects follow the 80/20 rule. What I mean by that is that 80% of the value comes from the final 20% of work, yet that final 20% of work is usually not the “fun stuff.” It’s usually writing the blog, building and refining the application, figuring out a deployment. As a data scientist, I’m more interested in the project part than the final outcome, but creating that final finished piece of work is so so so valuable.
This is the first post in a two part series on making and hosting tangible apps online. The main idea of this post is to use JavaScript combined with Pyodide to create Python apps in the browser. This has the advantage that we can use Github Pages to host the app statically and avoid server costs, backends, etc. In part two we’ll build this more interesting App which uses scikit-learn, pandas, etc to take data, train a model, and visualize the performance.
I can already hear a rebuttal to this approach, “Why not Streamlit? Doesn’t Streamlit solve these problems?” Streamlit has done a tremendous amount to help data scientists create applications. It’s invaluable when it comes to making simple good looking data science apps, BUT there is a massive barrier for most data scientists when it comes to getting these applications into the hands of other people. Deploying a streamlit app in an accessible way is non trivial, and it costs money to boot. Most folks starting out in their career don’t want to pay server costs monthly to keep a simple app up and running to showcase their work.
What if I told you you could host data science apps reliably, scalably, and for free? That’s what this blog post is about. By the end of it you’ll understand how to create simple static webapps and host them for free on Github Pages. In this tutorial we’ll make a static website hosted on Github Pages that uses Python to alter some text and display it in the browser.
By the end of the series we’ll build a simple data visualization application that let’s a user upload some data, train some models, and visualize the results all in a browser from anywhere.
Let’s get started!
Appeal to Reader
If you pay for Medium, or haven’t used your free articles for this month, please consider reading this article there. I post all of my articles here for free so everyone can access them, but I also like beer and Medium is a good way to collect some beer money : ). So please consider buying me a beer by reading this article on Medium.
Architecture Overview
What we are building is not entirely in Python, but it will be close. I promise. We’ll use a few cool tools to build our application. The main idea is to create a static website that we can host on Github Pages. Github pages is an awesome tool for creating sites and documentation associated with your repositories. It turns out, we can also use it to host low traffic static websites on the cheap as well. What this means is that the functionality of our site has to exist client side, that’s the static part.
To accomplish this we’ll use JavaScript and HTML to create a “frontend” and we’ll use Pyodide as a “backend.” The way to think about it is that JavaScript will handle what folks see on the site and Python will do the computational heavy lifting on the backend.
Creating the Web page.
I’m going to level with you, this ain’t gonna be pretty. To keep things small and readable I’m not going to be doing any CSS, so the app is going to look like a hot pile of trash. However, it will be functional and once you’ve got the functionality dialed you can spice it up with a little pizzaz (CSS). Start by creating a repository in Github and adding a single file called index.html.
To start we’ll need to get access to Pyodide by accessing it through a CDN. Create a header inside of index.html file:
<!DOCTYPE html>
<html>

<head>
    <meta charset="UTF-8">
    <script src="https://cdn.jsdelivr.net/pyodide/v0.19.1/full/pyodide.js"></script>
</head>
This block of code loads in the JavaScript libraries necessary to use Pyodide. Next we’ll fill in the body. This is where we add the interactive widgets to our app. We’ll add a title, an input box to take our name for our simple greeter function, and a text area to display our greeting.
<body>
    <h1>Simple Greeter</h1>
    <input id="data-input" type="text" value="Geoffrey Hinton">
    <button class="js-submt">Submit</button>
    <p id="greeting"></p>
    <!-- CODE TO GO HERE -->
</body>
</html>
Let’s pause for a moment and run this to get a visualization of what this looks like. I like to use Python’s built in http server. In the same directory as index.html in your terminal run:
python -m http.server
Depending on your OS and how Python is configured you might have to run:
python3 -m http.server
This will start a simple http server hosting your index.html file at http://localhost:8000. Head over there and you should see something like this:
Nothing is populating our <p id=”greet”></p> tag at the moment because we haven’t added any JavaScript. Now let’s use Python to create the greeting and shove it back into the frontend!
Pyodide!
This is where Pyodide comes in. Pyodide is Python compiled to WebAssembly. WebAssembly is a hot new tool which most modern browsers support acting as a common binary instruction format that we can use to interface across browsers. Pyodide is a version of Python compiled to this universal language. It’s pretty neat. The main thing to know is that we can pass information from JavaScript to Python and back again. If we create a simple Python function that creates a greeting and put it in a main.py file then we can use Pyodide to call this function from inside JavaScript:
def greet(name):
 return f"hello {name}"
To call this function from JavaScript we’ll need to create a script section in our HTML, and add an asynchronous main loop which can run our code. Place this code directly under the last <p> tag from above.
<script type="text/javascript">
 // Create a main loop function to run.
 async function main() {
  console.log("hello world!")
 };

 // Run the main loop.
 main();
</script>
Don’t worry too much about this. Have the mental model that the main() method is going to run our code and what we put in there is going to do the work. If you log into the browser and open the console you should see hello world! printed there:
With our main loop established we then need to load in both Pyodide, and the main.py module that we created with our greet function. Add the following lines to our script.
<script type="text/javascript">
 // Create a main loop function to run.
 async function main() {
  // Grab the python code.
  // when working locally change this to http://localhost:8000/main.py
  const py_code = await (await fetch("http://localhost:8000/main.py")).text();

  // Load in the pyodide package
  const pyodide = await loadPyodide({
   indexURL: "https://cdn.jsdelivr.net/pyodide/v0.19.1/full/"
  });

  // Load in the main.py module.
  pyodide.runPython(py_code);
 };

 // Run the main loop.
 main();
</script>
The first line fetches the Python module. If you do this for real online we’ll need to change this URL to the actual address of our module, but when testing locally you use your localhost path. Next we load in Pyodide from the CDN which makes it accessible in our script. Lastly we run our main.py module which makes all of the methods therein accessible. This bit of code is mostly boilerplate setting up the environment correctly.
Now to the fun part we can call our method and visualize the output.
<script type="text/javascript">

 // Create a main loop function to run.
 async function main() {
  // Grab the python code.
  // when working locally change this to http://localhost:8000/main.py
  const py_code = await (await fetch("http://localhost:8000/main.py")).text();

  // Load in the pyodide package
  const pyodide = await loadPyodide({
   indexURL: "https://cdn.jsdelivr.net/pyodide/v0.19.1/full/"
  });

  // Load in the main.py module.
  pyodide.runPython(py_code);

  // Grab the value of the input field
  const data = document.getElementById("data-input").value;

  // Run the greet method in Python and get the result.
  const out = pyodide.runPython(`greet(${JSON.stringify(data)})`);

  // Display the output.
  document.getElementById("greeting").innerText = out;
 };

 // Run the main loop.
 main();
</script>
There are three new pieces here. The first gets the value in the input box by querying the document for the data-input id. This grabs the input text box where users interact with our app so that we can get their input. The second new line uses Pyodide to run the greet function. We need to pass in the function as a string and then Pyodide evaluates that string in the context of methods it has available. In this case, since we loaded in our main.py module with this line
pyodide.runPython(py_code);
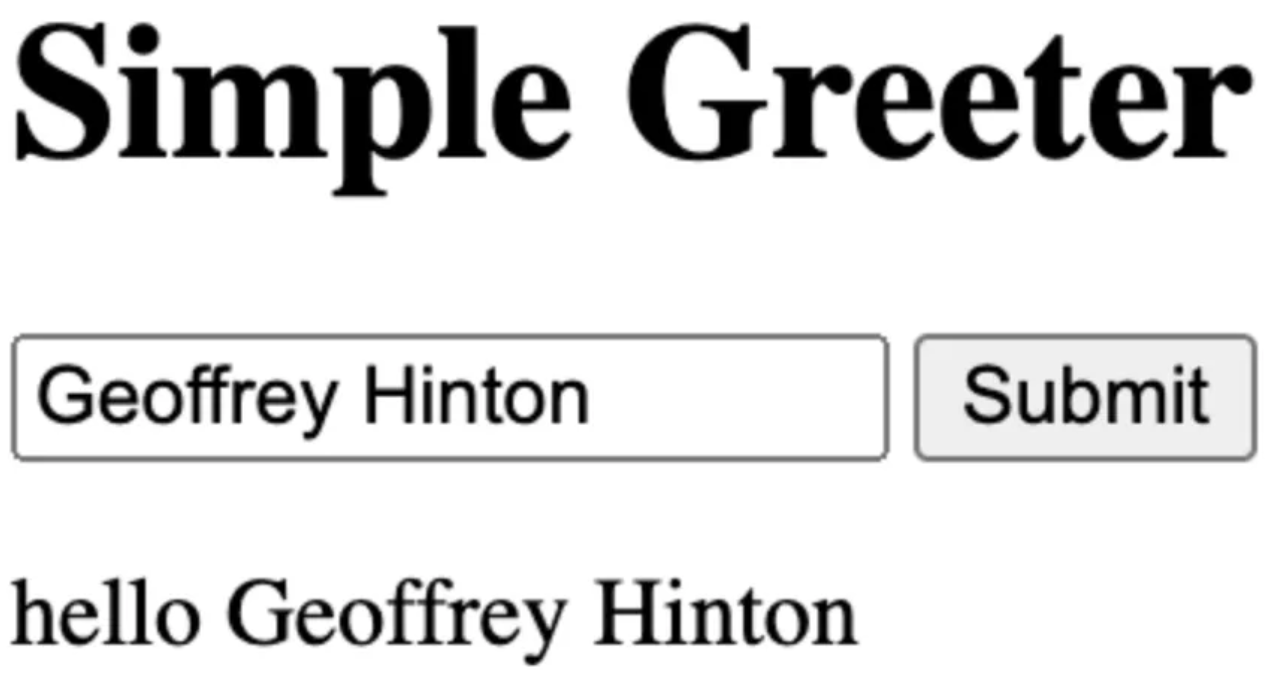
the greet() method is available to us to call this way. The last line updates the <p> tags with the string that is output from our Python function. Now when you open the page you should see:
We’ve successfully called a Python function from JavaScript! The last piece of this puzzle is to make it interactive. You’ll notice that the submit button doesn’t actually do anything at the moment. To make it functional we’ll need to grab the button and listen for a click event. Start by using the document querySelector to grab the submit button.
const btnSubmt = document.querySelector(".js-submt");
When a click event is observed we’ll have to execute our python code by adding an event listener to this button.
btnSubmt.addEventListener("click", () => {compute();});
We now need to make the compute() function which does the work whenever the button is called. This will require a small refactor of what we have above where we wrap the Python call and getting the value from the input field in the compute funciton like so:
const compute = async () => {

 // Grab all input values.
 const data = document.getElementById("data-input").value;

 // Run the monte Carlo Simulation
 const out = pyodide.runPython(`greet(${JSON.stringify(data)})`);
 document.getElementById("greeting").innerText = out;
};
Now when the button is clicked it should update the greeting! The submit button should now work. Try it ou!
The final file should look like:
<!DOCTYPE html>
<html>

<head>
    <meta charset="UTF-8">
    <script src="https://cdn.jsdelivr.net/pyodide/v0.19.1/full/pyodide.js"></script>
</head>

<body>
    <h1>Simple Greeter</h1>
    <input id="data-input" type="text" value="Geoffrey Hinton">
    <button class="js-submt">Submit</button>
    <p id="greeting"></p>
    <script type="text/javascript">

        // Setup all input fields for access.
        const btnSubmt = document.querySelector(".js-submt");

        async function main() {
            // Grab the python code.
            // when working locally change this to http://localhost:8000/main.py, otherwise make it the location of the raw file on github.
            const py_code = await (await fetch("http://localhost:8000/main.py")).text();
            const pyodide = await loadPyodide({
                indexURL: "https://cdn.jsdelivr.net/pyodide/v0.19.1/full/"
            });

            // Load in the packages
            pyodide.runPython(py_code);
            const compute = async () => {

                // Grab all input values.
                const data = document.getElementById("data-input").value;
                console.log(data)

                // Run the monte Carlo Simulation
                const out = pyodide.runPython(`greet(${JSON.stringify(data)})`);
                document.getElementById("greeting").innerText = out;
            };

            btnSubmt.addEventListener("click", () => {
                compute();
            });
            btnSubmt.click();
        };
        main();
    </script>
</body>

</html>
Deploying the Application
This is great! we made a small application that leverages Python in the browser, but now you want to share what you’ve made with the world! Enter Github pages, we’ll use Github pages to host our index.html on the internet for free. As long as our application doesn’t need to do anything dynamic we can host it here forever, for free.
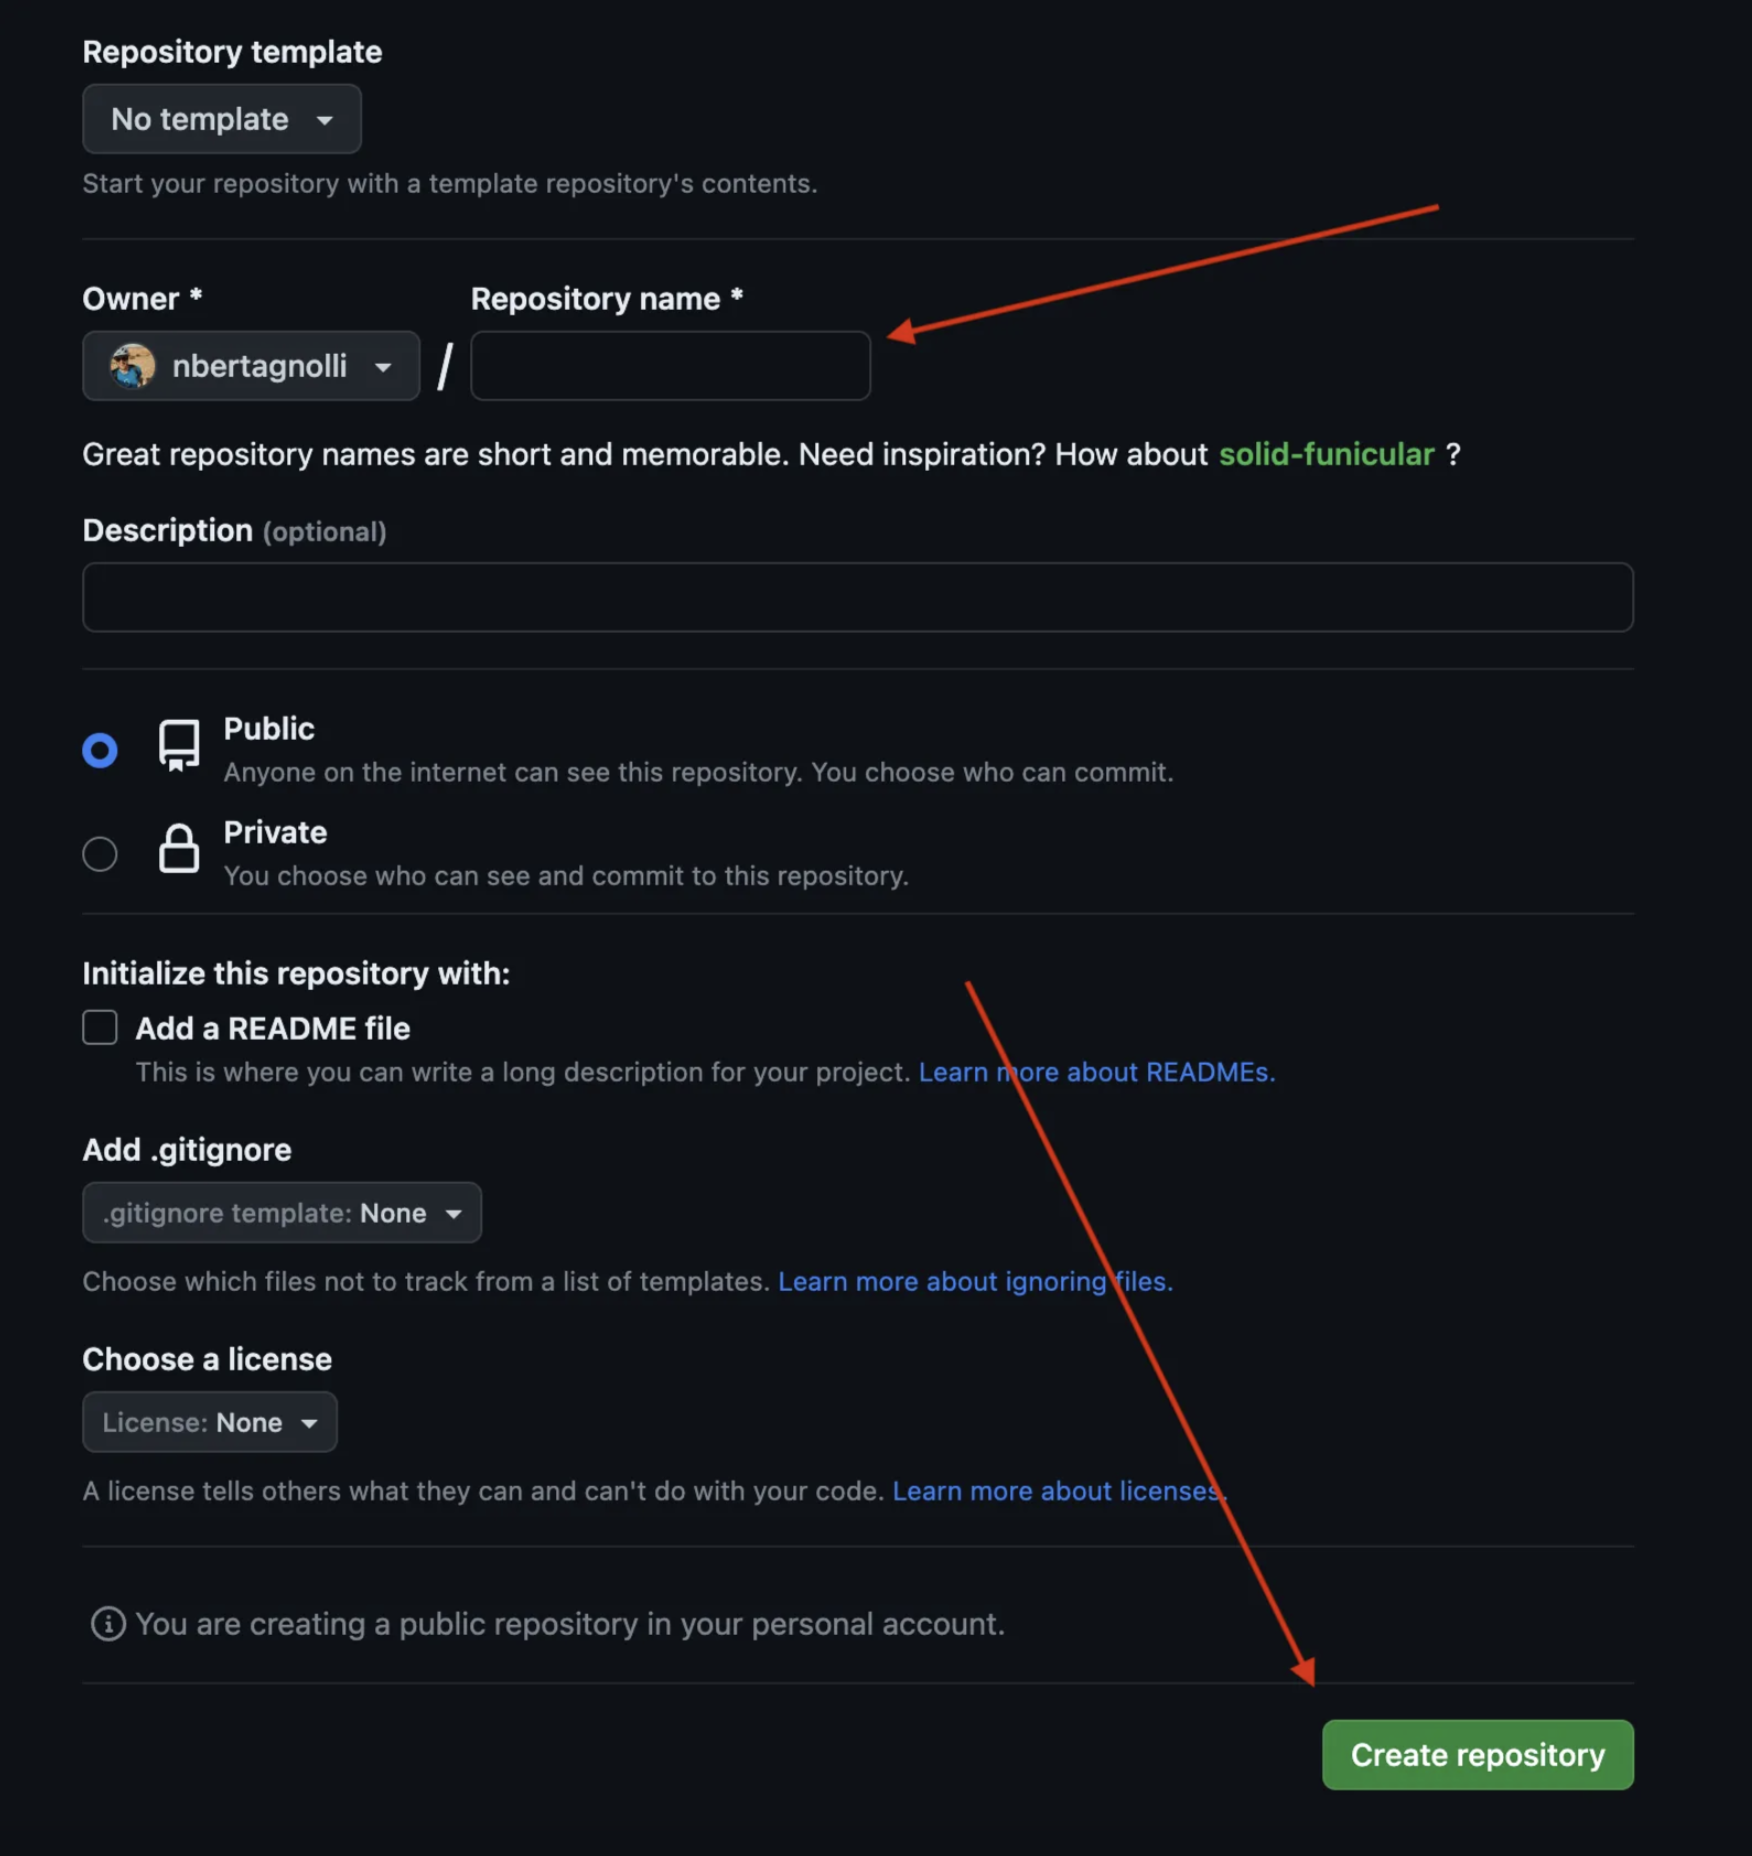
Log on to to GitHub and create a repository for this project by going to the repositories section and clicking the new button.

From their fill in the repository name. For this project I named my repository easy-static-datascience-webapp. You can name it more or less whatever you want. Once you have a suitable name click Create Repository at the bottom. The repository must be public.
This will create a new repository. Clone it to your local machine by running:
git clone git@github.com:<your-username>/<repo-name>.git
Now put the index.html file in this repository and commit it to GitHub.
git add index.html
git commit -m "Added homepage to my app"
git push
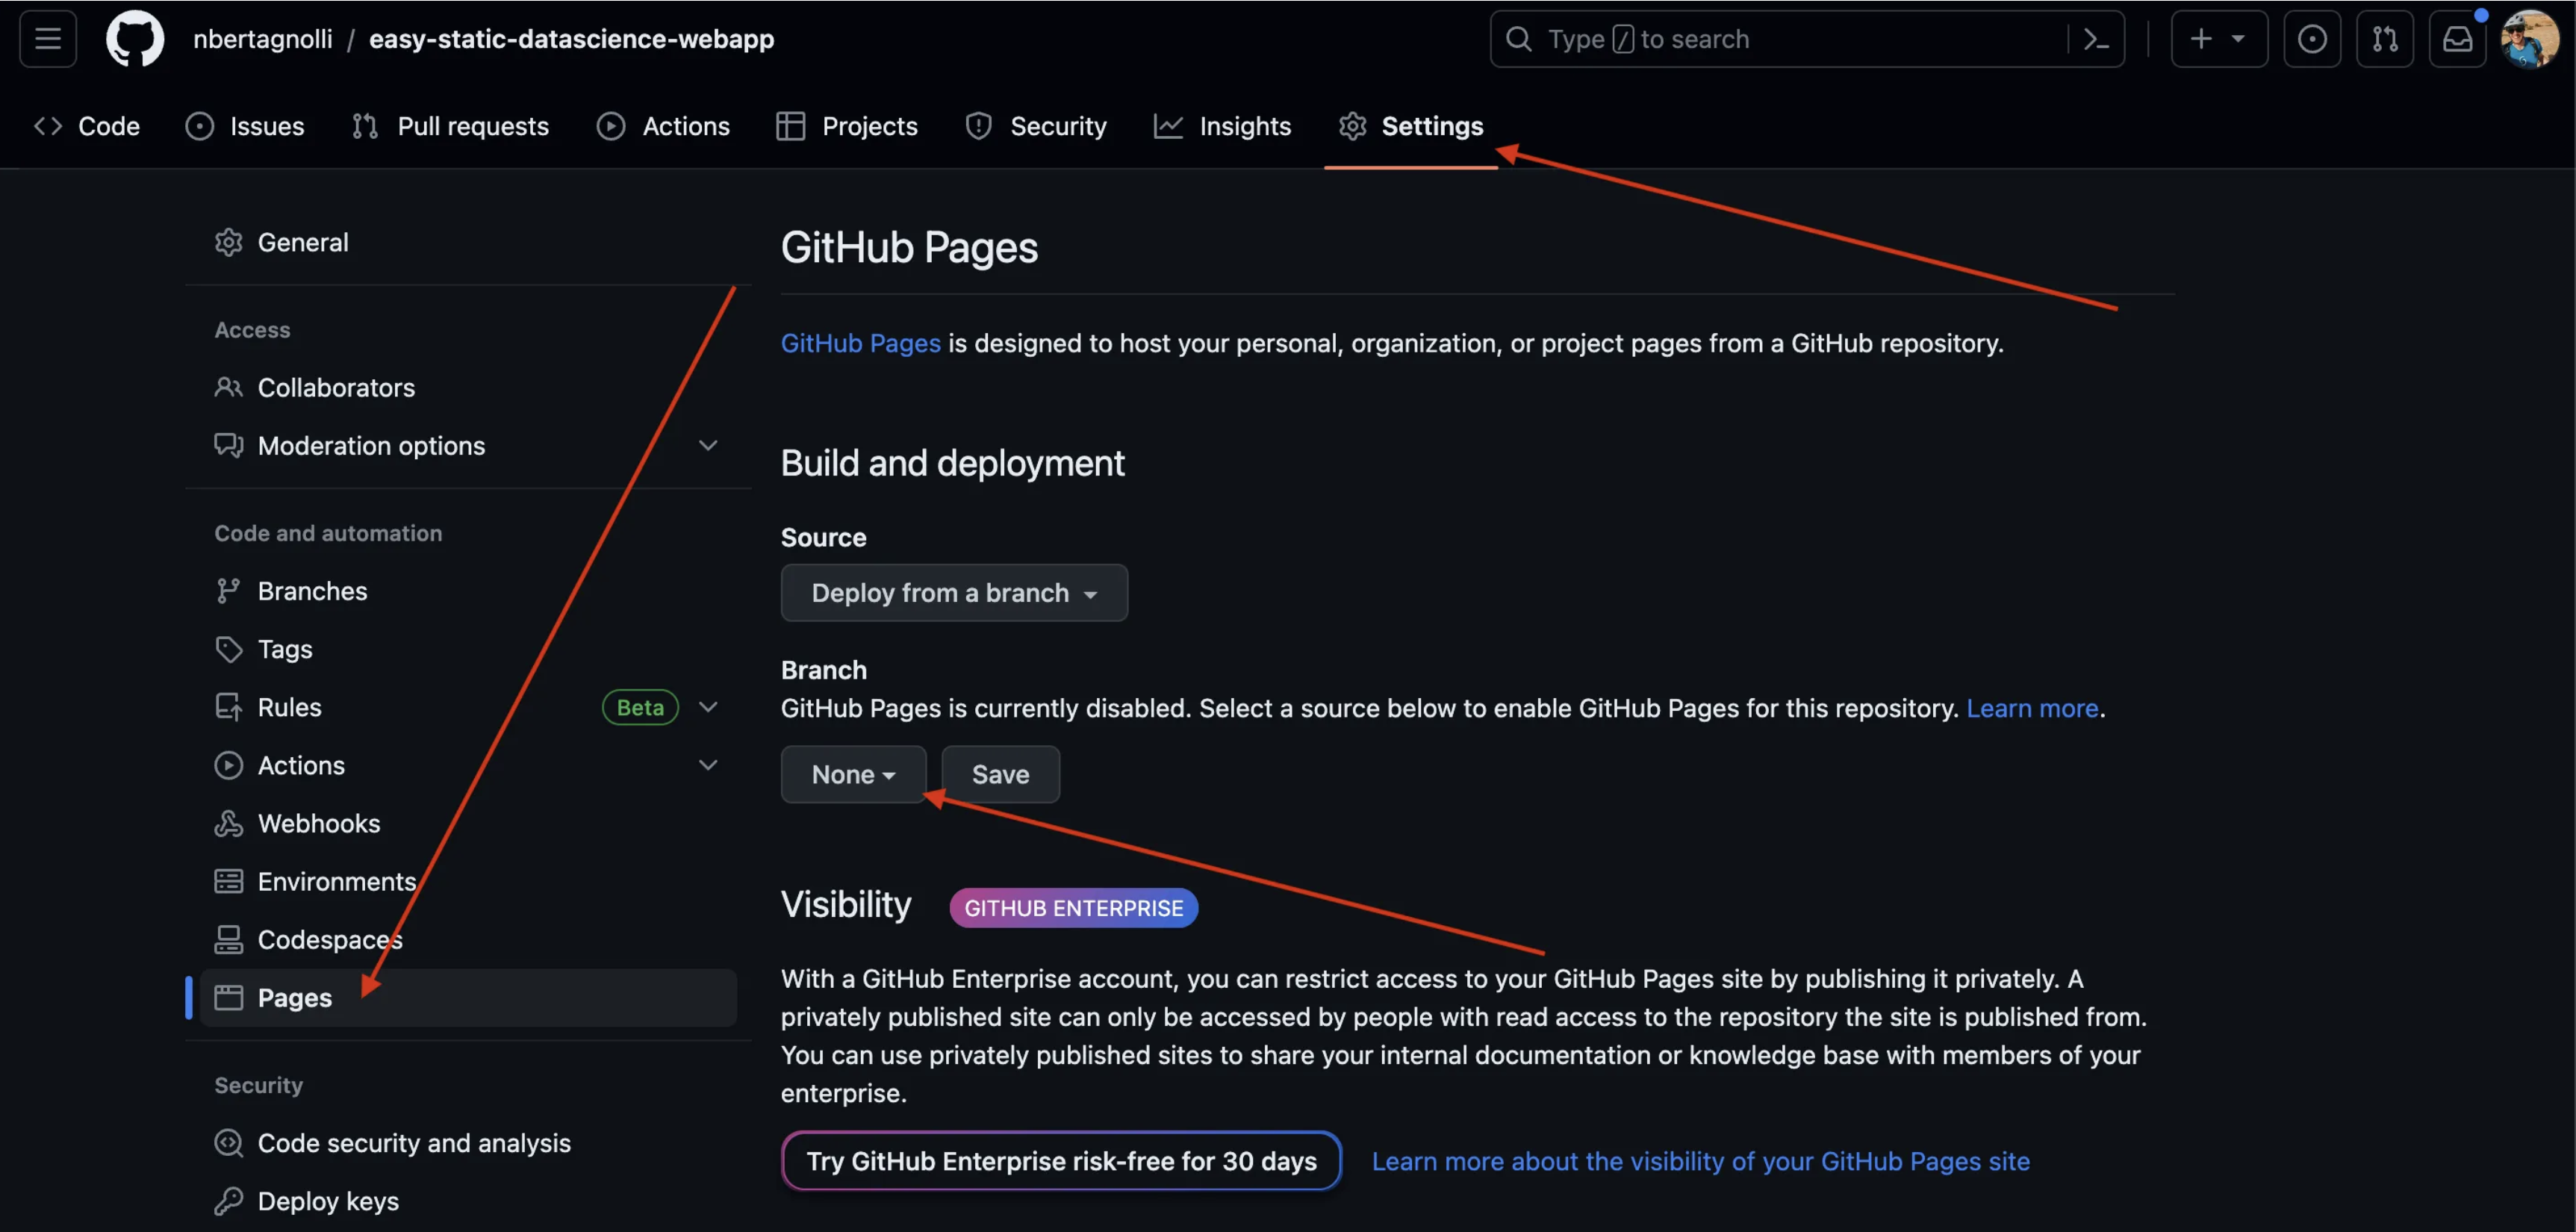
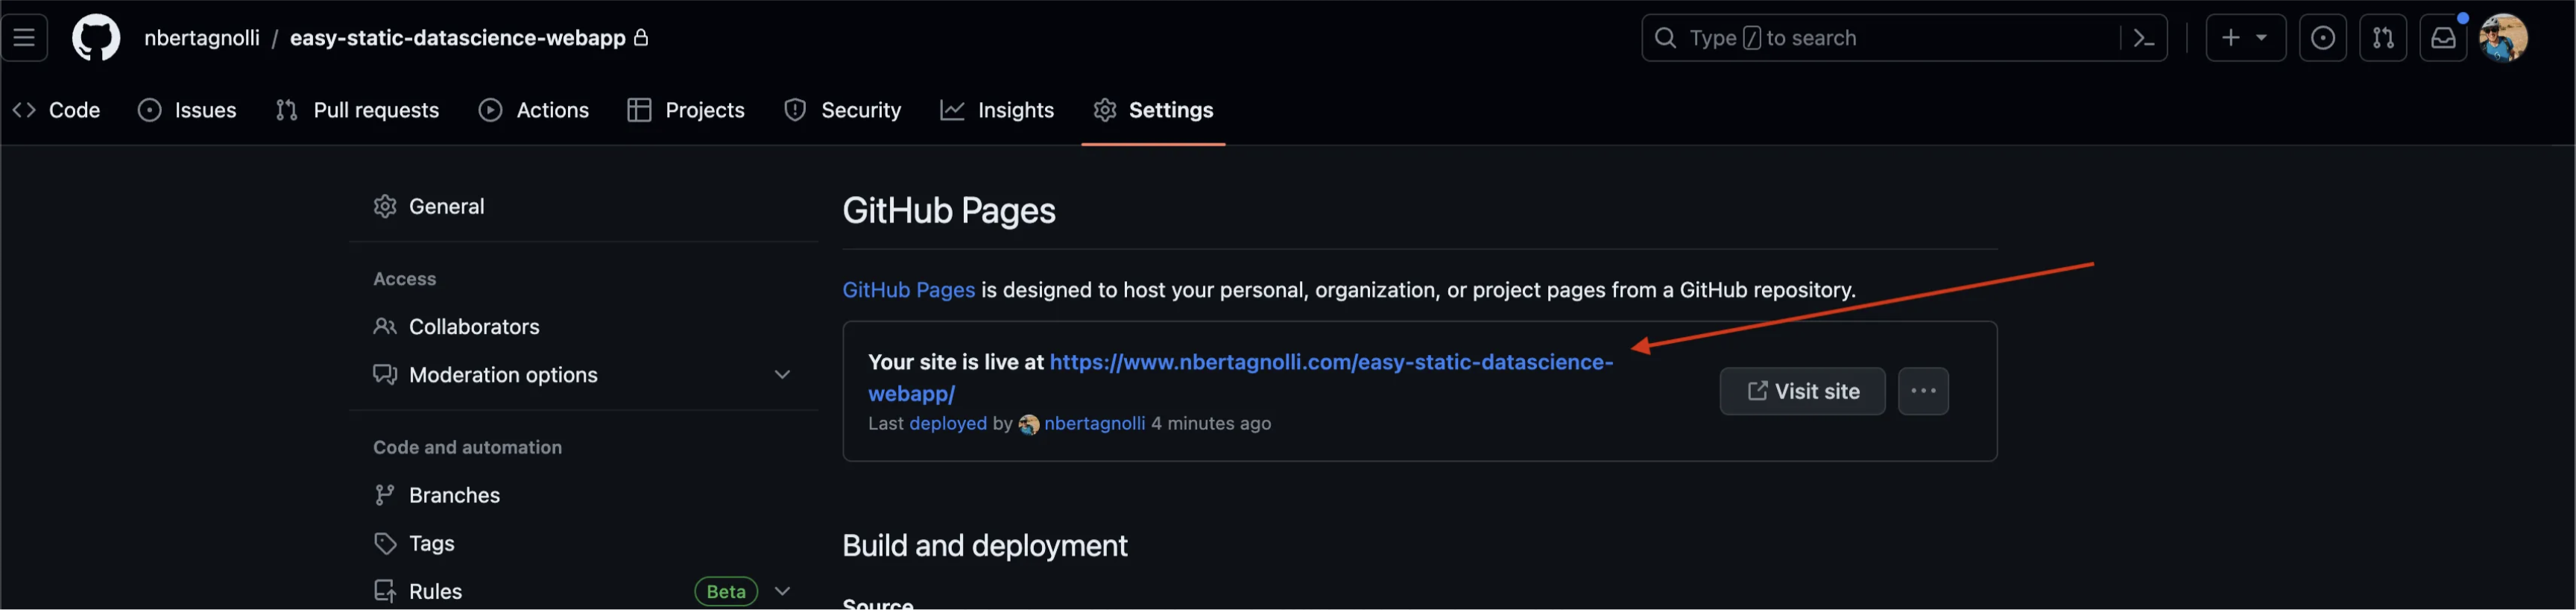
The last step before we can see our work online is to enable pages on the repository. In GitHub click on Settings then Pages. On the GitHub pages page click on the branch drop down and select main . This tells GitHub that we want to create a website built off of the main branch of our site.
Wait a few minutes and your site should be live. Once the site is done building refresh this page and you should see the link for your site at the top. Click it and take a look!
Conclusion
In this post we created a simple web application to call Python from JavaScript and deployed it to the web. With this basic workflow you can create all kinds of interesting applications to showcase your work. A few that I’ve made:
Is a retirement and savings simulator that uses Monte Carlo Sampling to estimate whether or not you’ll run out of money in retirement or how much money you will have after saving for some number of years. It’s a cool technique for thinking about finances.
This is an example of running an LLM client side using ONNX. The application takes in some example text and uses Perplexity based on GPT2 to estimate whether or not the text was written by GPT or a human.
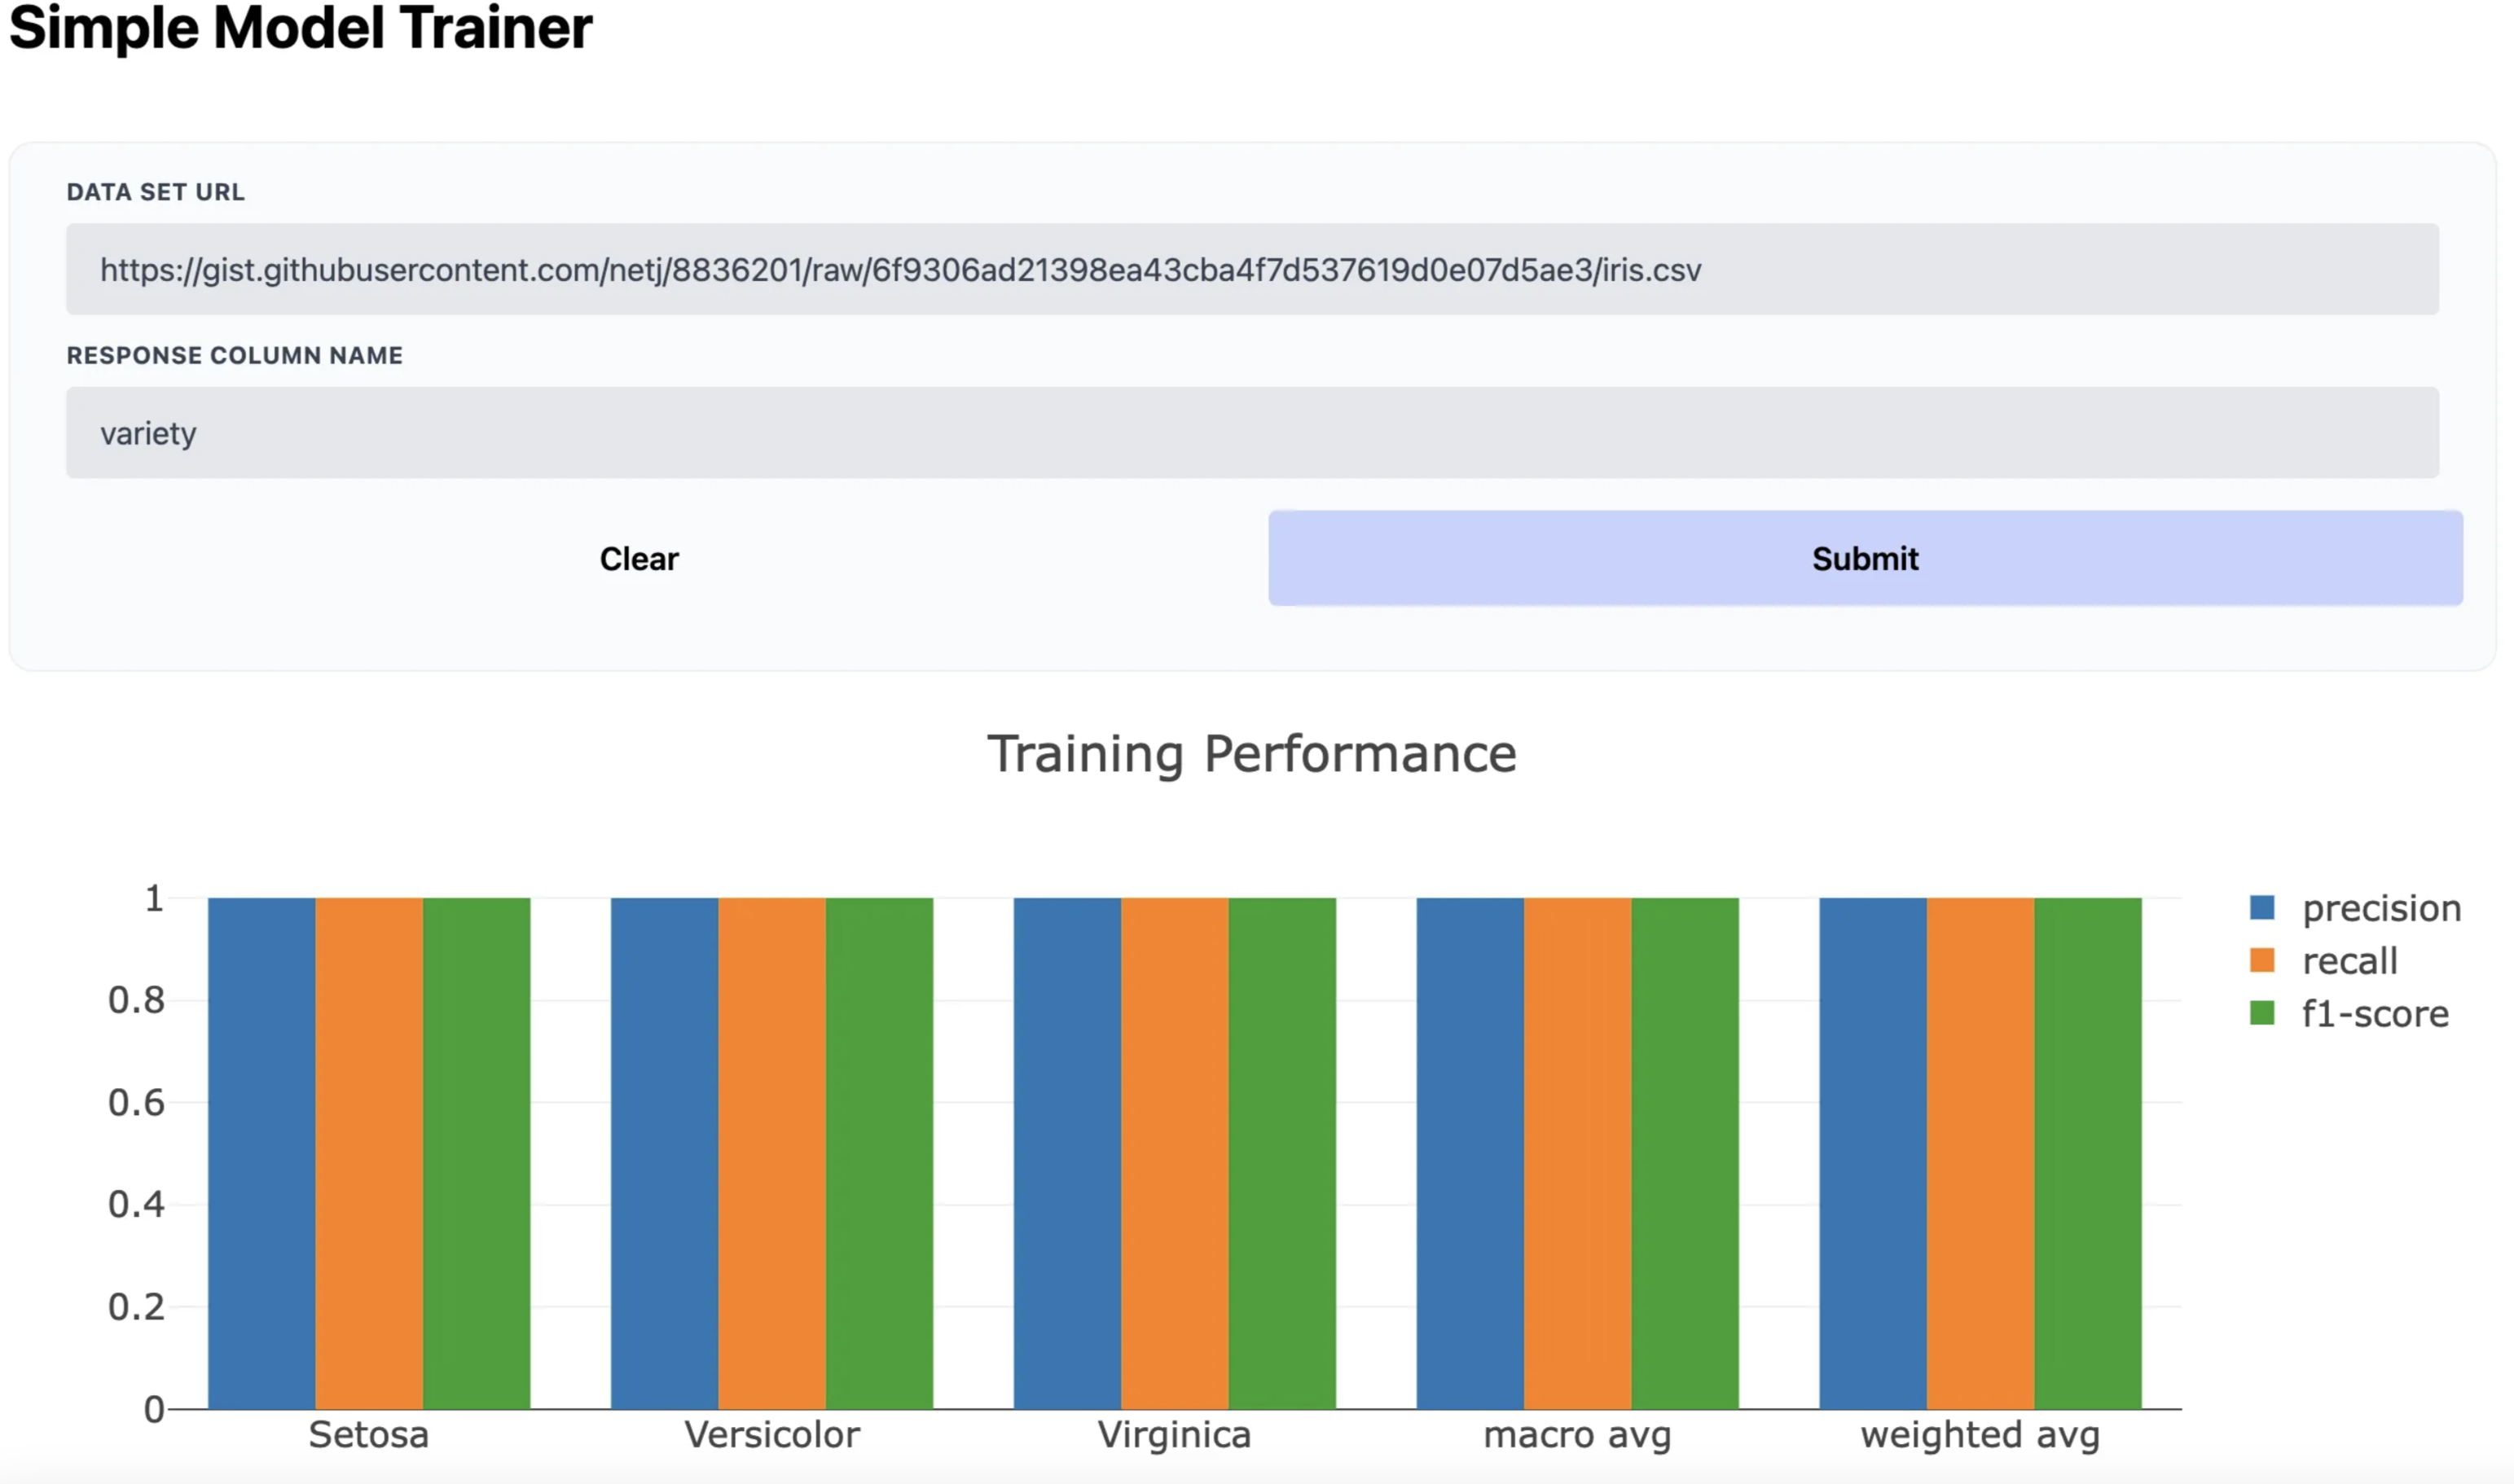
This is the example app we’re building together! It takes in a tabular dataset from the web, trains a simple model in your browser, and plots the results. It’s a simple app to highlight the powerful things you can do when you merge Python, JavaScript, and free static web hosting!
In part two of this series we will build this data science app.
In that post we’ll cover:
- Setting up a custom domain name for your site
- Doing something non trivial like training a scikit-learn model
- Plotting the results with plotlyjs
- Prettying up the site with some CSS.
See you in the next post!