Easy CDK Deep Learning EC2 Instances
Introduction
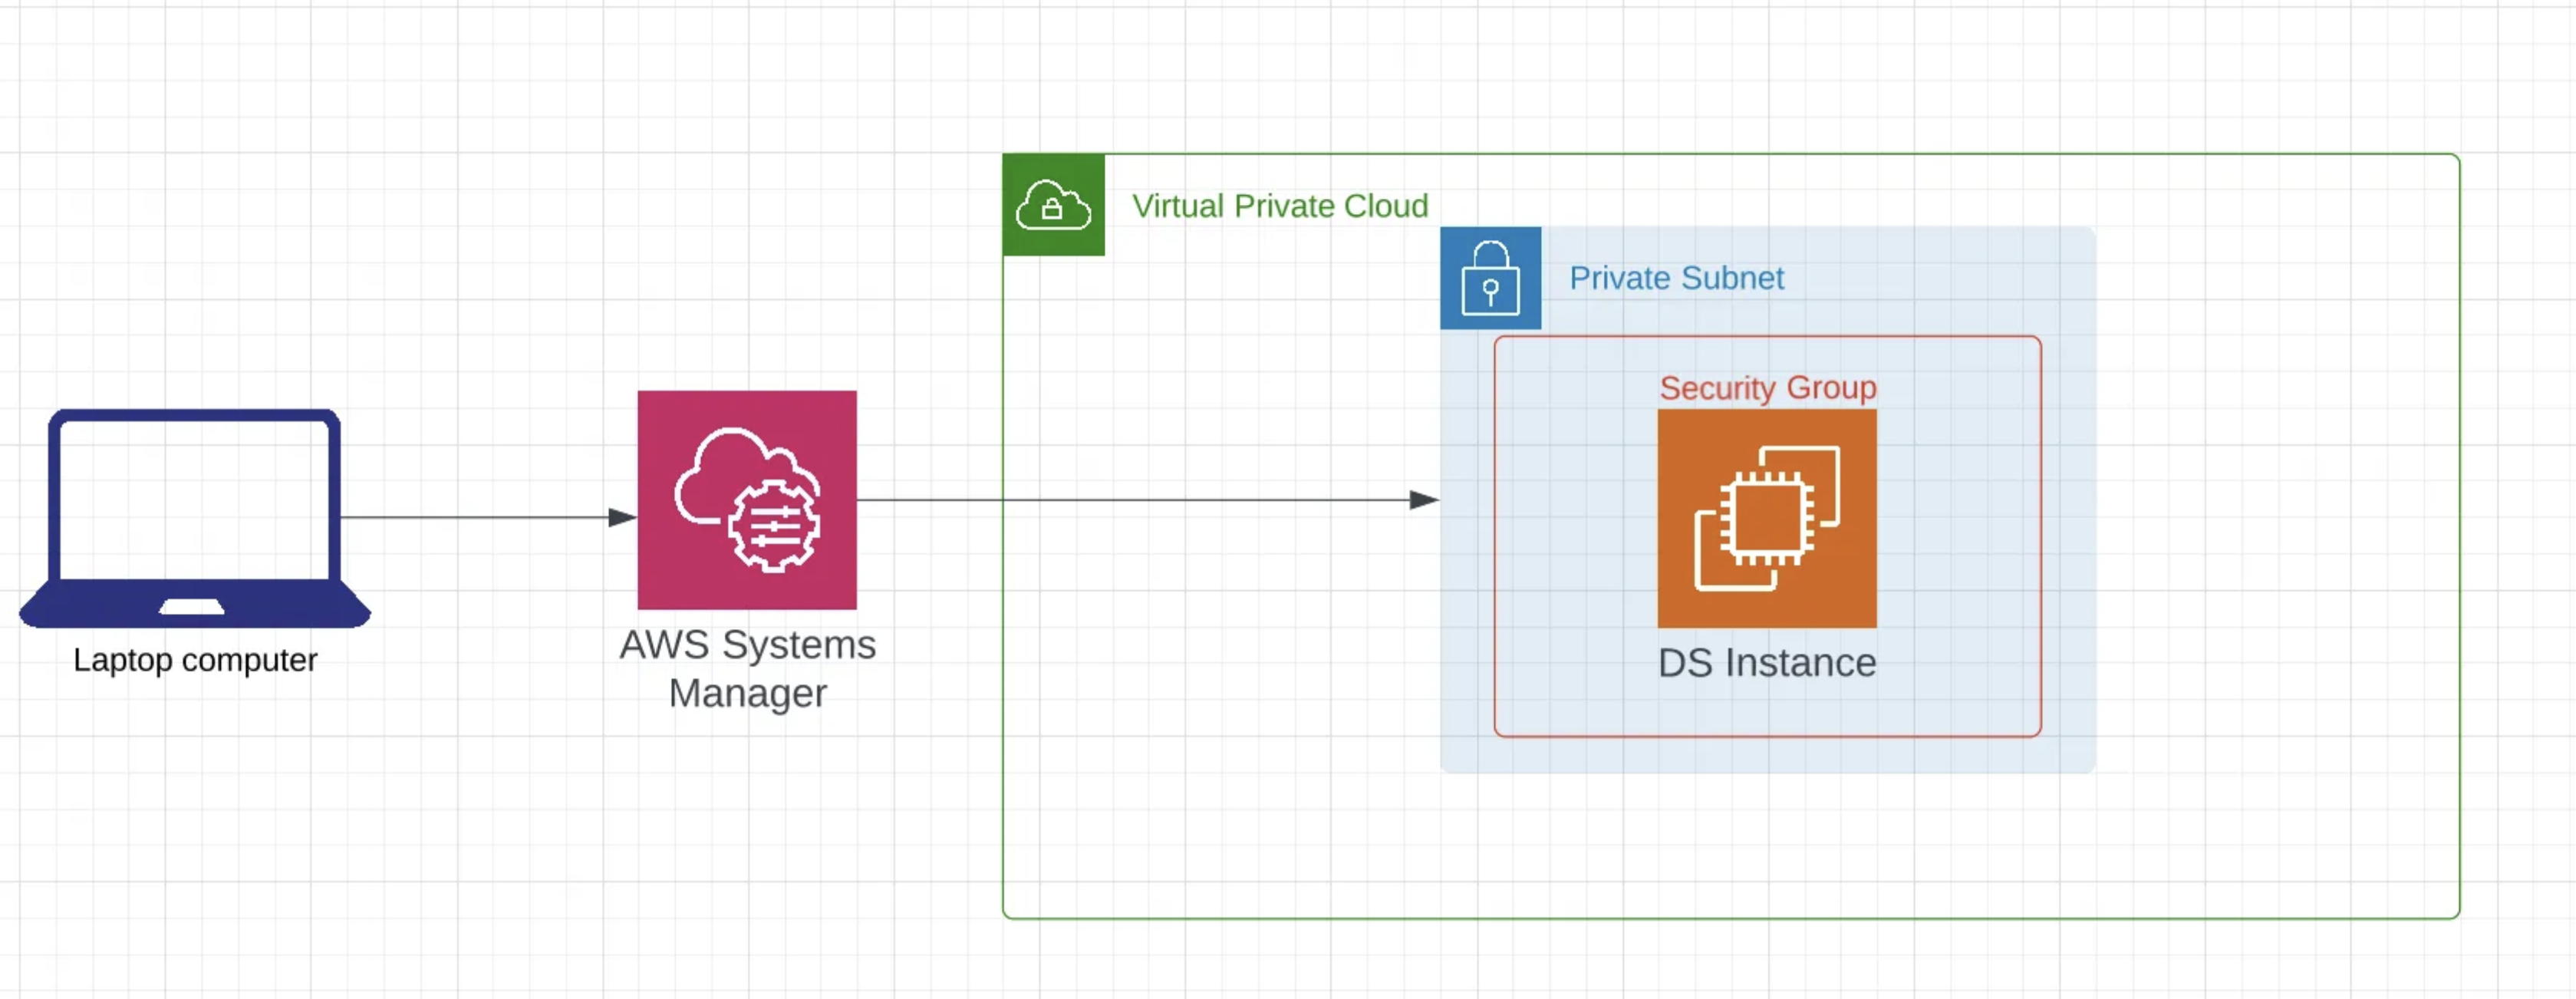
As a data scientist I often have to run jobs on GPUs in the cloud and I have a visceral hate for clicking through UIs. In the past when I needed a GPU instance for some one-off model training I laboriously navigated through AWS’ UI. Not anymore! Now it’s easy to create an EC2 stack that knows how to install and instantiate everything you need. In this tutorial we’ll use AWS CDK to create an EC2 instance. We’ll protect that EC2 instance on a private subnet in a VPC and only allow inbound traffic. We’ll then connect to this instance using AWS Secure Session Manager (SSM). This is cool because in the past if you wanted your machine to be on a purely private network you needed a bastion host, with SSM this is no longer the case! All of the code for this tutorial can be found here. At the end of all of this you’ll be able to run a few commands and have a fully functioning Data Science ready secure EC2 instance with a JupyterLab interface.
All code for this tutorial can be found here.
Appeal to Reader
If you pay for Medium, or haven’t used your free articles for this month, please consider reading this article there. I post all of my articles here for free so everyone can access them, but I also like beer and Medium is a good way to collect some beer money : ). So please consider buying me a beer by reading this article on Medium.
CDK
CDK is the cloud development kit created by AWS. It allows us to create resources in the cloud using languages like python or typescript. It’s really easy to use and it’s free unlike services like Pulumi (What I use in production). However, CDK is just a wrapper around CloudFormation so you inherit all of the limitations of that system.
If you’re interested in learning a bit more about CDK I’d recommend following this tutorial. It will walk you through everything you need to setup CDK and create a very simple API. It’s well worth the read if you haven’t. I’m going to assume that you’ve completed the New Project section of that tutorial and setup CDK on your local machine. From here on out we’ll focus on creating the EC2 instance.
Create a project folder
mkdir ds-ec2 && cd ds-ec2
Once inside the new folder we can instantiate our project.
cdk init --language=python
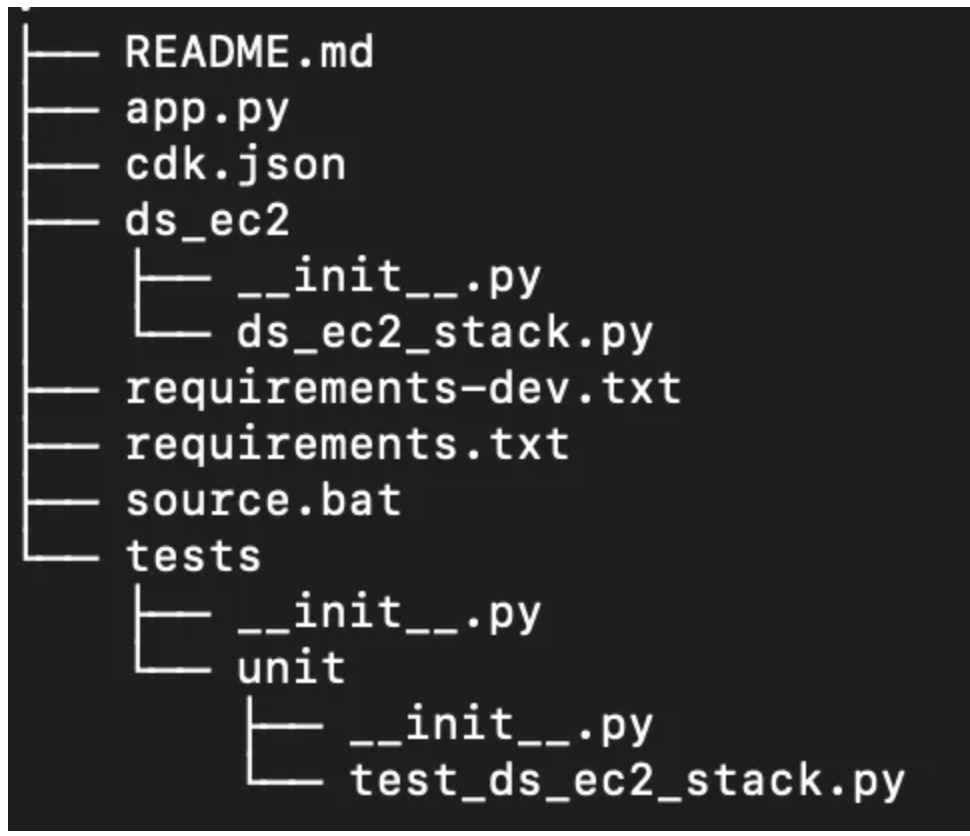
This will create a bunch of files but there are really only two that you need to focus on and that’s app.py and ds_ec2_stack.py.
app.py defines the CDK app and is the entry point for deployment. If you want to deploy multiple interconnected stacks this is the place to edit. We won’t be doing much here though.
ds_ec2_stack.py is where we will define our stack and resources. It’s the workhorse of this whole system so let’s get started by editing this file and adding what we want!
Activate your environment and install the CDK libraries.
source .venv/bin/activate
pip install -r requirements.txt
Creating the EC2 instance and other resources.
If you don’t care about the particulars of CDK and what is happening skip down to Deploying the stack and just clone the repository.
Otherwise, the code below needs to:
1. Create a VPC
We create a VPC for all of our resources to live in.
# Create a VPC to control the network our instance lives on.
vpc = ec2.Vpc(self, "ds-vpc", cidr="10.0.0.0/16")
2. Assign permissions for the instance to use SSM
We create an IAM role for this instance which allows us to add a managed policy giving the instance the ability to be connected to through SSM.
# Create a session manager role so we can connect without SSH.
role = iam.Role(
    self,
    "ds-ec2-role",
    assumed_by=iam.ServicePrincipal("ec2.amazonaws.com"),
    role_name="ds-ec2-role",
)

# Provide access to SSM for secure communication with the instance.
role.add_managed_policy(
    iam.ManagedPolicy.from_aws_managed_policy_name(
        "AmazonSSMManagedInstanceCore",
    )
)
3. Create a Security Group
We want our instance to be on a private subnet and only allow inbound traffic. This helps with security because nothing in our instance can leave our network.
# Create a security group that only allows inbound traffic.
security_group = ec2.SecurityGroup(
    self,
    "ds-security-group",
    vpc=vpc,
    allow_all_outbound=True,
    security_group_name="ds-security-group",
)
4. Install all of the python libraries we care about
One thing that is nice about using CDK is we can setup custom logic around installing Python dependencies. I have mine setup to install a bunch of common libraries that I use so once I connect to the instance it’s ready to go. We can do that using CDK by using ec2.MultipartUserData(). This is just a fancy way of passing in user data to the instance to allow it to run some configuration for you.
# Create initializatoin commands for non GPU instances
multipart_user_data = ec2.MultipartUserData()

python_other_pkgs = []
env_activate_cmd = "python3.8 -m "
install_python = ec2.UserData.for_linux()

# Install python3.8 on the instance
install_python.add_commands("sudo yum update & sudo amazon-linux-extras install -y python3.8 ")

# Activate python3.8 and install the CPU version of torch.
install_python.add_commands(
    f"{env_activate_cmd} pip install torch --extra-index-url https://download.pytorch.org/whl/cpu"  # noqa: E501
)

# Add the commands to the multipart user data and execute them.
multipart_user_data.add_part(ec2.MultipartBody.from_user_data(install_python))
Create a requirements.txt file in your project next to app.py. For me my file looks like:
matplotlib
seaborn
numpy
datasets
pandas
scikit-learn
boto3
nltk
transformers
spacy
jupyter
jupyterlab
Then load in a requirements.txt file so we know which packages to install.
# Create a list of all requirements we want installed on our instance.
with open("requirements.txt", "r") as f:
    python_pkgs = [x.strip() for x in f.readlines()]

# Install python dependencies.
pkgs_to_install = " ".join(python_pkgs)
install_dependencies = ec2.UserData.for_linux()
install_dependencies.add_commands(f"{env_activate_cmd} pip install {pkgs_to_install}")
multipart_user_data.add_part(ec2.MultipartBody.from_user_data(install_dependencies))
5. Add some block storage so we can load in some data
The default disk space on the EC2 instances is kind of small and usually I want a few GB’s of data loaded onto the instance to do my work. This attaches an EBS volume for additional disk space.
# Increase the disk space on the device
root_volume = ec2.BlockDevice(device_name="/dev/xvda", volume=ec2.BlockDeviceVolume.ebs(60))
6. Get the correct machine image for our instance type
If we are running a CPU instance we can use AmazonLinux
# Create a generic machine image for use with CPU.
image = ec2.MachineImage.latest_amazon_linux(generation=ec2.AmazonLinuxGeneration.AMAZON_LINUX_2)
If we are running a GPU we need to use a generic_linux MachineImage and pass it the AMI for the deep learning instance we want. For example, if deploying in us-west-2 we could use ami-0a83cbb39db39cb3e.
# Create a Machine Image with the specified AMI.
image = ec2.MachineImage.generic_linux({region: os.getenv("AWS_AMI")})
7. Create the EC2 instance
The last step is to instantiate the ec2 instance with everything we’ve made so far.
ec2.Instance(
            self,
            "ds-instance",
            role=role,
            instance_type=ec2.InstanceType(instance_type),
            machine_image=image,
            vpc=vpc,
            security_group=security_group,
            user_data=multipart_user_data,
            block_devices=[root_volume],
        )
Final Stack
The final stack I use is here. You’ll notice there is some additional logic. This logic checks whether the desired instance is a GPU or a CPU and then selects the correct stack components.
from aws_cdk import Stack, aws_ec2 as ec2
from aws_cdk import aws_iam as iam
from constructs import Construct
import os
from ds_ec2.utils import (
    get_instance_type,
    get_machine_image,
    is_gpu,
)


def is_gpu(instance_type: str) -> bool:
    """Check to see if an instance type is gpu enabled."""
    return "p" in instance_type or "g5" in instance_type or "g4" in instance_type


class DsEc2Stack(Stack):
    def __init__(self, scope: Construct, construct_id: str, **kwargs) -> None:
        """
        Create a single EC2 instance with the libraries need to do data science work.

        This ec2 instance understands whether it has a gpu or not and installs the
        correct libraries.  If not instance_type is provided defaults to c4.2xlarge.
        """
        super().__init__(scope, construct_id, **kwargs)

        # Get the current region to deploy to
        region = os.getenv("CDK_DEFAULT_REGION")

        # Get the instance type from the environment. If none then defaults c2.4xlarge.
        if "INSTANCE_TYPE" in os.environ:
            instance_type = os.getenv("INSTANCE_TYPE")
        else:
            instance_type = "c4.2xlarge"

        # Create a VPC to control the network our instance lives on.
        vpc = ec2.Vpc(self, "ds-vpc", cidr="10.0.0.0/16")

        # Create a session manager role so we can connect without SSH.
        role = iam.Role(
            self,
            "ds-ec2-role",
            assumed_by=iam.ServicePrincipal("ec2.amazonaws.com"),
            role_name="ds-ec2-role",
        )

        # Provide access to SSM for secure communication with the instance.
        role.add_managed_policy(
            iam.ManagedPolicy.from_aws_managed_policy_name(
                "AmazonSSMManagedInstanceCore",
            )
        )

        # Create a security group that only allows inbound traffic.
        security_group = ec2.SecurityGroup(
            self,
            "ds-security-group",
            vpc=vpc,
            allow_all_outbound=True,
            security_group_name="ds-security-group",
        )

        # Create initializatoin commands for non GPU instances
        multipart_user_data = ec2.MultipartUserData()

        # Create a list of all requirements we want installed on our instance.
        with open("requirements.txt", "r") as f:
            python_pkgs = [x.strip() for x in f.readlines()]

        # Check if the instance is a GPU if it isn't we want to install python
        # and install the cpu version of pytorch.  Otherwise we want to activate
        # the GPU enabled version of pytorch in the AMI.
        if not is_gpu(instance_type):
            python_other_pkgs = []
            env_activate_cmd = "python3.8 -m "
            install_python = ec2.UserData.for_linux()
            install_python.add_commands("sudo yum update & sudo amazon-linux-extras install -y python3.8 ")
            install_python.add_commands(
                f"{env_activate_cmd} pip install torch --extra-index-url https://download.pytorch.org/whl/cpu"  # noqa: E501
            )

            # Install python.
            multipart_user_data.add_part(ec2.MultipartBody.from_user_data(install_python))

            # Increase the disk space on the device.
            root_volume = ec2.BlockDevice(device_name="/dev/xvda", volume=ec2.BlockDeviceVolume.ebs(25))

            # Create a generic machine image for use with CPU.
            image = ec2.MachineImage.latest_amazon_linux(generation=ec2.AmazonLinuxGeneration.AMAZON_LINUX_2)

        else:
            python_other_pkgs = []

            # The deep learning AMI's have python installed we need to activate it.
            env_activate_cmd = "source activate pytorch; "

            # Increase the disk space on the device
            root_volume = ec2.BlockDevice(device_name="/dev/xvda", volume=ec2.BlockDeviceVolume.ebs(60))

            # Create a Machine Image with the specified AMI.
            image = ec2.MachineImage.generic_linux({region: os.getenv("AWS_AMI")})

        # Install python dependencies.
        pkgs_to_install = " ".join(python_pkgs + python_other_pkgs)
        install_dependencies = ec2.UserData.for_linux()
        install_dependencies.add_commands(f"{env_activate_cmd} pip install {pkgs_to_install}")
        multipart_user_data.add_part(ec2.MultipartBody.from_user_data(install_dependencies))

        # Create an EC2 instance ami-01dafd60663418a6f 1.12.0
        image = get_machine_image(instance_type, region)
        ec2.Instance(
            self,
            "ds-instance",
            role=role,
            instance_type=ec2.InstanceType(instance_type),
            machine_image=image,
            vpc=vpc,
            security_group=security_group,
            user_data=multipart_user_data,
            block_devices=[root_volume],
        )
Deploying the Stack
To deploy your stack run you’ll need to set two environment variables. INSTANCE_TYPE and AWS_AMI if you are using a GPU. If you want to deploy with the defaults you don’t need to set either of them. As an example of deploying a GPU instance run:
export INSTANCE_TYPE="instance-type"; export AWS_AMI="aws_ami_id"; cdk deploy
This will create all of the resources we’ve specified so far through CloudFormation. Once it’s completed you can log into the console and see your instance.

Grab the instance id from column two you’ll need it later to connect to the instance through SSM.
Setting up SSM
SSM allows us to use AWS IAM roles to manage access to instances. This is nice because we don’t have to open any ssh ports and can put the instance entirely on a private subnet, which is really nice from a security perspective. To enable SSM to work we need to modify our .ssh/config file with the following lines:
# SSH over Session Manager
host i-* mi-*
    ProxyCommand sh -c "aws ssm start-session --target %h --document-name AWS-StartSSHSession --parameters 'portNumber=%p'"
Don’t worry too much about this fancy command. It basically allows SSM to connect to the remote instance using Secure Shell(SSH) without opening an inbound port. Now to connect to the instance we can run:
aws ssm start-session --target instance_id --region=our_region
If you want to avoid the UI you can use the following command to get all EC2 instance ids from AWS.
aws ec2 describe-instances --region=your-region --query "Reservations[].Instances[?State.Name == 'running'].InstanceId[]" --output text
Setting up a remote notebook
JupyterLab provides a pretty nice interface for working on these remote servers. I like to setup a lab session and then connect to it through SSM. On your remote instance create a screen to hold the jupyter session so it’s easy to find and manage later.
screen -S jupyter
Make sure you’re in a folder where you have read and write permissions by default your EC2 instance will put you in /usr/bin If you run the following command this will put you in your user folder which should have read and write permissions for Jupyter.
cd /home/ssm-user
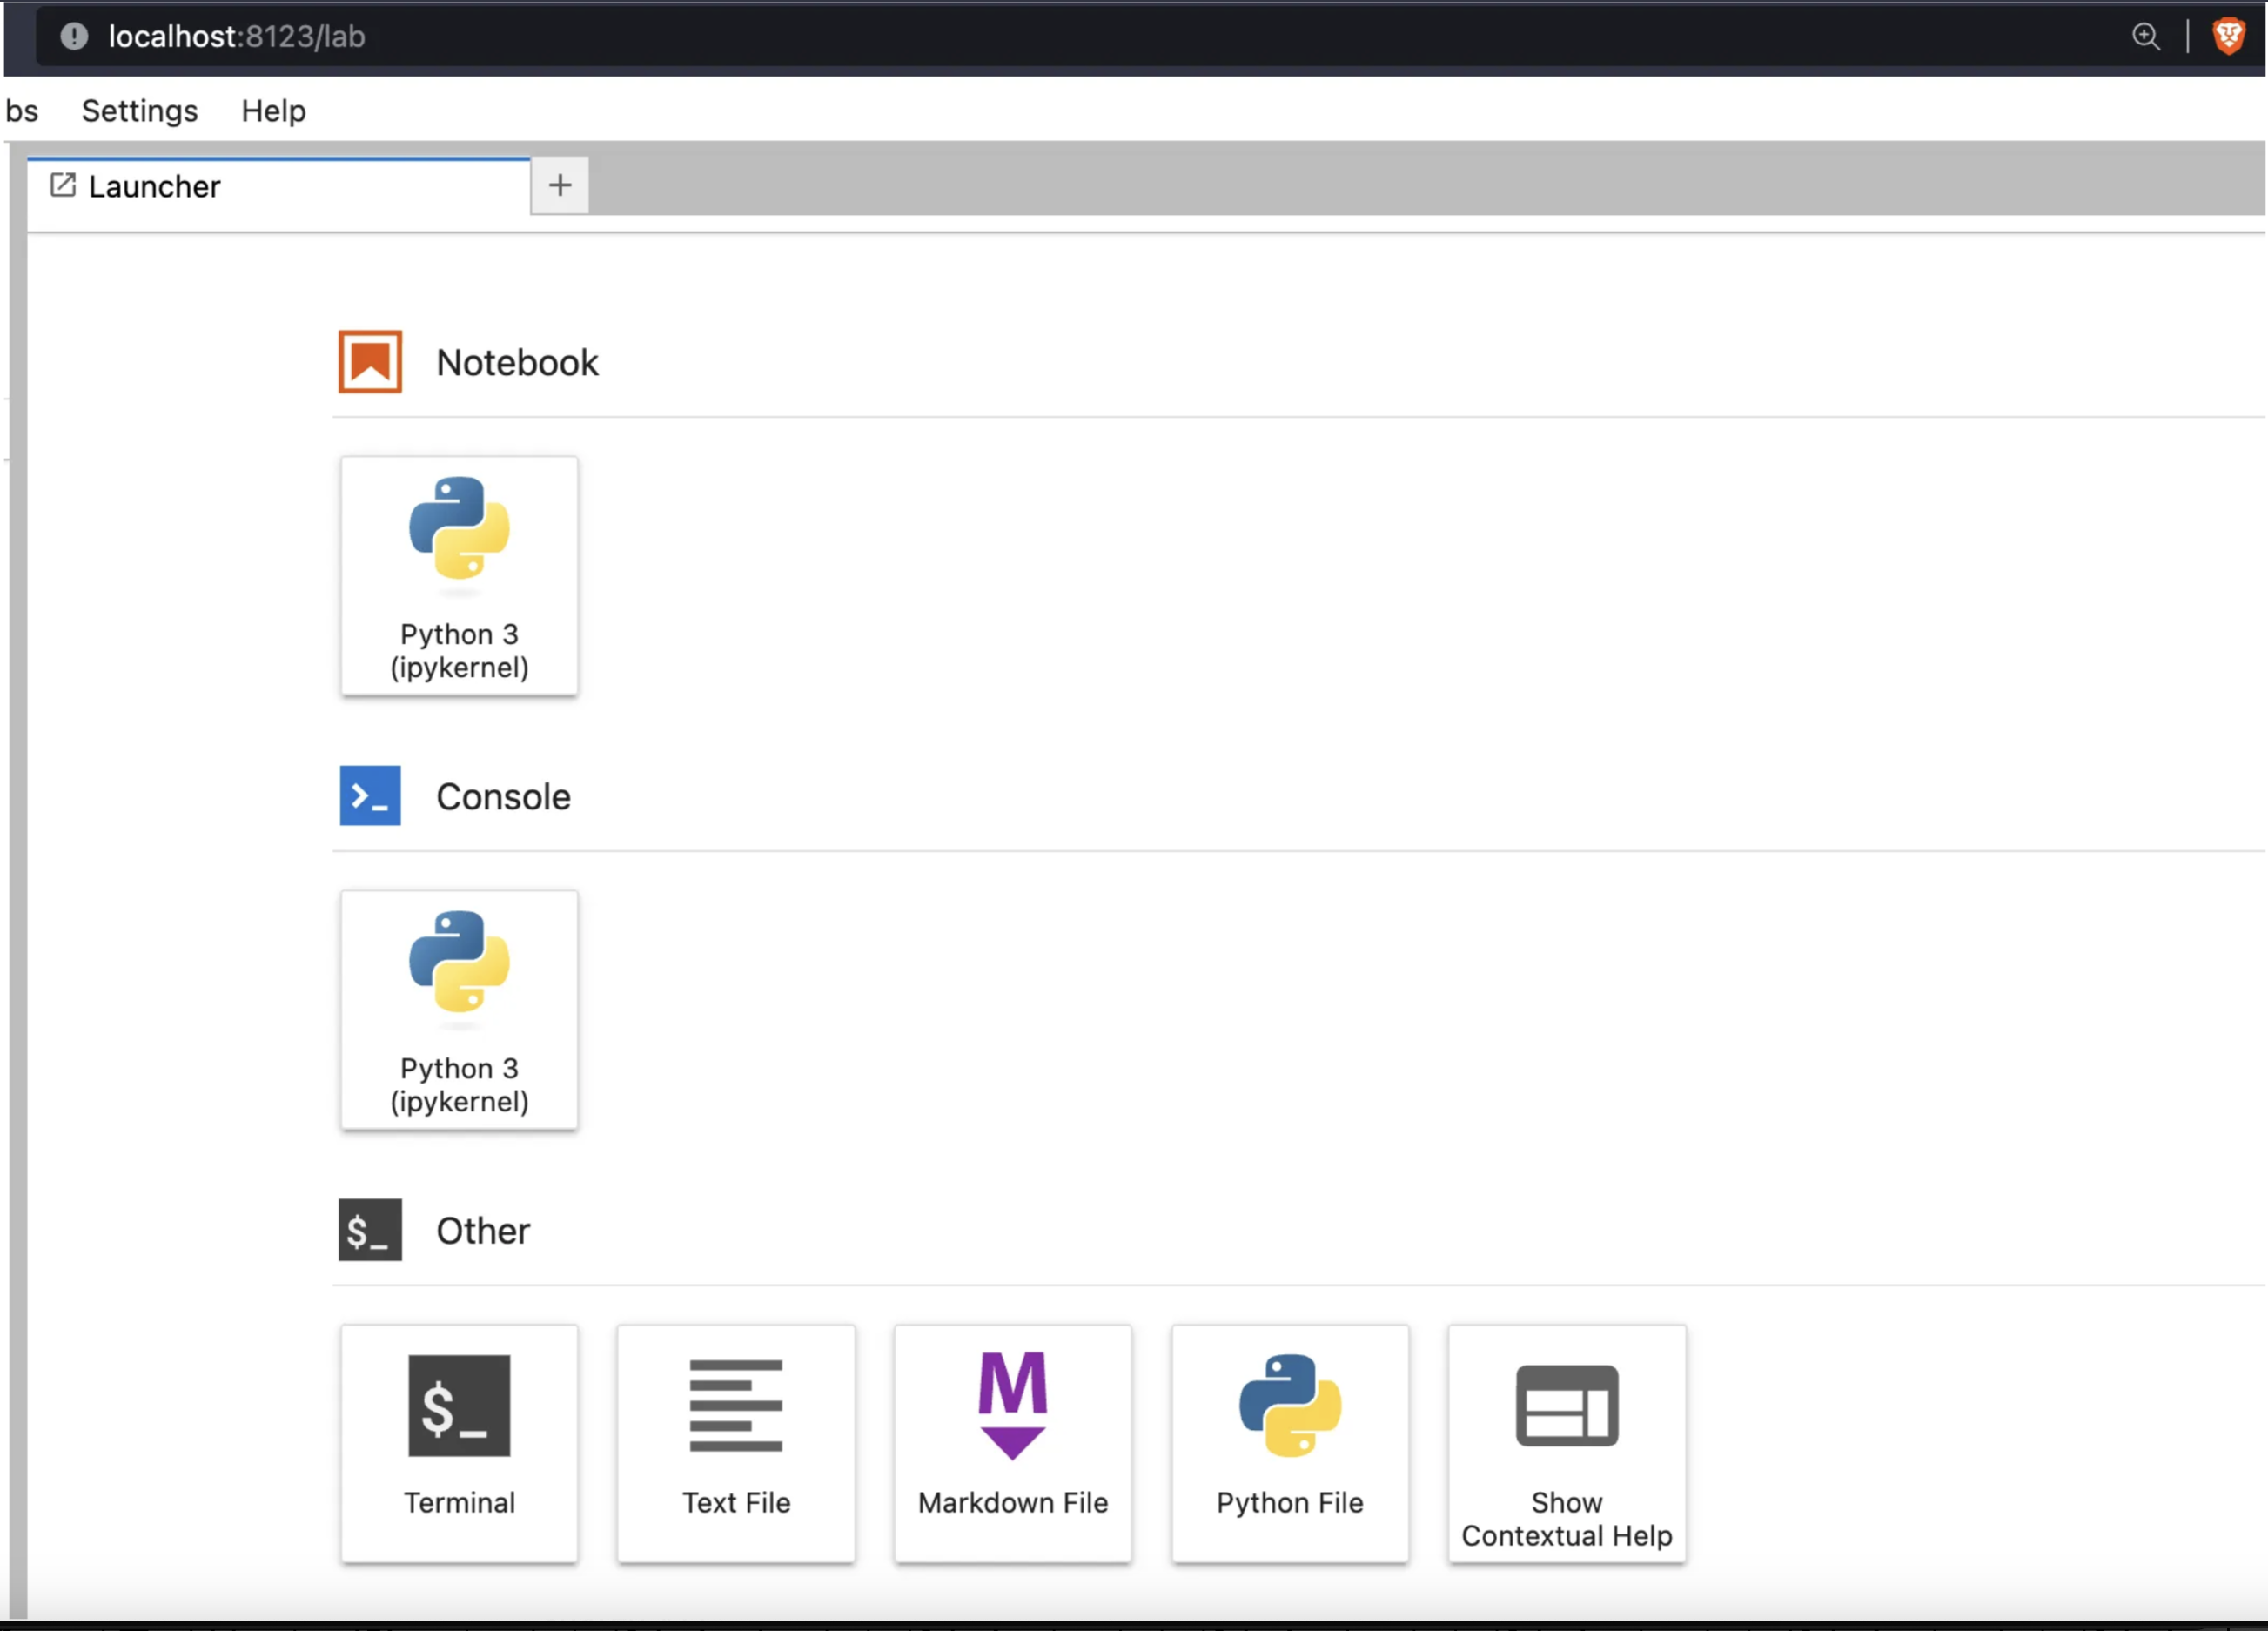
Now inside your screen create the JupyterLab instance. This command will create a JupyterLab session running on port 8123. We’ll use this port later to connect through SSM.
jupyter-lab --no-browser --ip=0.0.0.0 --port=8123
Now exit out of this connection (ctrl + d should work) and on your local machine run:
aws ssm start-session --target instance_id --region out_region --document-name AWS-StartPortForwardingSession --parameters '{"portNumber":["8123"],"localPortNumber":["8123"]}'
Make sure the port in this command matches the previous one. This will open a tunnel to your instance through SSM and forward all traffic on port 8123. Now just go to localhost:8123 in your browser and Voila! You have a connection to your remote instance and can do all of the fun jupyterlab things there.
Tearing things down
Once you’re done with everything and want to destroy your instance simply run cdk destroy. This command will clean up everything you deployed in that stack.
Next Steps and Caveats
Hopefully this makes it easy for you to start and manage EC2 instances for yourself. I’ve found it to be a very nice way of interacting with EC2 instances. There are a few things you should keep in mind. This script creates a VPC. Often times AWS limits the number of custom VPCs you can have in a region to 5 so if you want to create multiple instances it’s pretty inefficient to generate a VPC for every instance (and by inefficient I mean don’t do it…). The goal here is personal development not a large shared team. Let me know in the comments if you want me to write another post on creating that shared VPC.
As next steps try and get the AMI automatically from AWS instead of hardcoding it. Try and use CfnParameters instead of environment variables for the instance type. Try and create a shared VPC instance. All of these would be good projects to improve the above code. Happy building!