Build a BERT Sci-kit Learn Transformer
Introduction
Getting state of the art results in NLP used to be a harrowing task. You’d have to design all kinds of pipelines, do part of speech tagging, link these to knowledge bases, lemmatize your words, and build crazy parsers. Now just throw your task at BERT and you’ll probably do pretty well. The purpose of this tutorial is to set up a minimal example of sentence level classification with BERT and Sci-kit Learn. I’m not going to talk about what BERT is or how it works in any detail. I just want to show you in the smallest amount of work how to use this model really easily with Sci-kit Learn. At the end of this blog post we’ll have a world class Ekman emotion detection model and BERT packaged into a modular Sci-kit Learn transformer which we can plug and play in one line of code with any existing Sci-kit pipeline!
Appeal to Reader
If you pay for Medium, or haven’t used your free articles for this month, please consider reading this article there. I post all of my articles here for free so everyone can access them, but I also like beer and Medium is a good way to collect some beer money : ). So please consider buying me a beer by reading this article on Medium.
Why BERT?
A big part of machine learning is figuring out what good features are for your Task. If you have features which represent your problem space well learning is a snap! The difficulty is it’s hard, or at least traditionally it was hard, to create good features for a language task. Each task had its own flavor of features and a lot of work went into figuring out what information should be included in the model and how.
BERT is a deep transformer model trained on an enormous amount of text. The massive amount of pretraining combined with the model architecture and a few neat training tricks allow BERT to learn “good” features for NLP tasks. Here we are going leverage all of this excellent work and use the PyTorch transformer library to create a reusable feature extractor. We’ll be able to plug this feature extractor into any Sci-kit Learn model. For more information on how BERT works please read Jay Alamar’s excellent blog posts on BERT, and using BERT.
Creating a BERT Feature Extractor for Sci-kit Learn
For most of my projects, I try to start simple and see how far I can get with Sci-kit Learn. I personally like using their pipeline API where any given model is a composition of transformers and estimators. Whenever a newfangled method like BERT comes along I build a transformer or an estimator for it. Then I can incorporate it easily into any existing pipeline I have without much work. So let’s create a Sci-kit Learn transformer for BERT that we can plug and play with any estimator.
This transformer should map a list of strings to the corresponding BERT features associated with the string. So our type signature should be List[str]→torch.FloatTensor
Using the hugging face transformer library there are three main steps to this transformation:
-
Breaking the string into integer encoded tokens
-
Running BERT on the encoded tokens to get the BERT representations of the words and sentences
-
Combining and extracting the parts of the BERT representations into the features that we want for our model.
Tokenization
Tokenization is only two lines of code. We define the tokenizer we want and then run the encode_plus method which lets us set things like maximum size and whether to include special characters.
tokenizer = BertTokenizer.from_pretrained("bert-base-uncased")
tokenized_dict = tokenizer.encode_plus(
    "hi my name is nicolas",
    add_special_tokens=True,
    max_length=5
    )
The output from this function is:
{'overflowing_tokens': [2003, 9473],
 'num_truncated_tokens': 2,
 'special_tokens_mask': [1, 0, 0, 0, 1],
 'input_ids': [101, 7632, 2026, 2171, 102],
 'token_type_ids': [0, 0, 0, 0, 0]}
You’ll notice that we set the maximum sequence length to five, there were only five words in the input I provided, and yet it says that there were two truncated tokens. This is because we set add_special_tokens to True. For the BERT model this means adding a [CLS] “class” token and a [SEP] “separator” token. These two tokens contribute to that maximum of five so we end up dropping two words. This is just something to be aware of. With this dictionary we only need the input_ids field which holds the integer encoding of the tokenized words that we will pass to the BERT model.
The CLS token holds the sentence embedding and the separator token is used to tell BERT that a new sentence will come next. For our basic sentence classification task we will use the CLS embedding as our set of features.
Model
The next step is to generate the sentence embeddings using the BERT classifier. Again the transformer library does most of the work for us. We can create a simple BERT model and run the prediction on our tokenized output.
bert_model = BertModel.from_pretrained("bert-base-uncased")
tokenized_text = torch.tensor(tokenized_dict["input_ids"])
with torch.no_grad():
  embeddings = bert_model(torch.tensor(tokenized_text.unsqueeze(0))
Notice that the BERT model needs to take in a tensor of the form [batch_size,sentence_length] which means we need to unsqueeze the one dimensional matrix.
Also note how we use torch.no_grad() here. I forgot to do that the first time I processed a large batch of samples and ran my server out of memory. So remember to turn off the gradients before running predictions or you’ll save way too much gradient information and have a bad time. The returned tuple has two fields by default, the first is a matrix of size:
batch size × sentence length × embedding dimension
For the base BERT model and our example this ends up being [1, 5, 768]. The first tensor holds the embeddings we are interested in for classification. The second tensor holds the pooled outputs. The pooled outputs are the [CLS] embedding after it has been passed through a Linear layer and a Tanh activation function while training on the next sentence. For this tutorial we can ignore it.
Extract the Embeddings
The last thing we need to complete our BERT feature extractor is a way to combine the final embeddings into a single vector we can use for classification. For most classification tasks you can do pretty well by just grabbing the embedding for the [CLS] token. Which we can do with this function:
get_cls = lambda x: x[0][:, 0, :]This will take that Tuple of the embeddings and pooled outputs, grab the embeddings and take all the batches, just the first CLS token, and all of the embedding neurons.
But maybe you want to get fancy and use other features. Let’s say you want to use all of the embeddings for your prediction we could concatenate them all together with a different function:
flatten_embed = lambda x: torch.flatten(x[0])This will return one big vector composed of the embedding for every token in the sequence. By defining functions which operate on the final layers we can be more flexible in the features we use for downstream classification. This will make more sense in the context of the Sci-kit Learn transformer.
Putting it All Together
Those three basic pieces are all that we need to get the embeddings for a single sentence. To link easily with Sci-kit Learn methods we want to operate on a large list of sentences. We can do that by building a Sci-kit Learn transformer (We’re making a transformer transformer!). This way we can just pass a list to it, call the transform function, and our classifier can start learning. We make a new class called BertTransformer which inherits from BaseEstimator and TransformerMixin and put the code we worked on above in as a tokenization step and a prediction step.
from sklearn.base import TransformerMixin, BaseEstimator
import torch

class BertTransformer(BaseEstimator, TransformerMixin):
    def __init__(
            self,
            bert_tokenizer,
            bert_model,
            max_length: int = 60,
            embedding_func: Optional[Callable[[torch.tensor], torch.tensor]] = None,
    ):
        self.tokenizer = bert_tokenizer
        self.model = bert_model
        self.model.eval()
        self.max_length = max_length
        self.embedding_func = embedding_func

        if self.embedding_func is None:
            self.embedding_func = lambda x: x[0][:, 0, :]

    def tokenize(self, text: str) -> Tuple[torch.tensor, torch.tensor]:
        # Tokenize the text with the provided tokenizer
        tokenized_text = self.tokenizer.encode_plus(text,
                                                    add_special_tokens=True,
                                                    max_length=self.max_length
                                                    )["input_ids"]

        # Create an attention mask telling BERT to use all words
        attention_mask = [1] * len(tokenized_text)

        # bert takes in a batch so we need to unsqueeze the rows
        return (
            torch.tensor(tokenized_text).unsqueeze(0),
            torch.tensor(attention_mask).unsqueeze(0),
        )

    def tokenize_and_predict(self, text: str) -> torch.tensor:
        tokenized, attention_mask = self.tokenize(text)

        embeddings = self.model(tokenized, attention_mask)
        return self.embedding_func(embeddings)

    def transform(self, text: List[str]):
        if isinstance(text, pd.Series):
            text = text.tolist()

        with torch.no_grad():
            return torch.stack([self.tokenize_and_predict(string) for string in text])

    def fit(self, X, y=None):
        """No fitting necessary so we just return ourselves"""
        return self
This transformer uses all of the tokenization code we wrote earlier in lines 21–35, and the prediction and extraction code on lines 37–41. The only other thing we do is link it all up in a transform method which uses a single list comprehension to tokenize and then embed all sentences in a list.
Now we can make super simple pipelines with all the power of BERT and all of the simplicity of classic Sci-kit Learn models!
Data Set
For our data we will be using the Figure-Eight Sentiment Analysis: Emotion in Text data set. This data set has 40K tweets classified into 13 different emotional states. I just loaded the data into a pandas data frame and randomly split the data into a 70% train set, a 15% validation set, and a 15% test set.
figure8_df = pd.read_csv("text_emotion.csv")split = np.random.choice(
    ["train", "val", "test"],
    size=figure8_df.shape[0],
    p=[.7, .15, .15]
)
figure8_df["split"] = splitx_train = figure8_df[figure8_df["split"] == "train"]
y_train = x_train["sentiment"]
Training the Model
Training the model is wicked easy. We just define a pipeline with a single transformer and a single estimator.
bert_transformer = BertTransformer(tokenizer, bert_model)
classifier = svm.LinearSVC(C=1.0, class_weight="balanced")model = Pipeline(
    [
        ("vectorizer", bert_transformer),
        ("classifier", classifier),
    ]
)model.fit(x_train["content"], y_train)
That’s it, we’re done. This will train an SVM on the BERT CLS embeddings, but what if we wanted some classic TF-IDF features too? That’s easy as well! We just make a feature union and pass it to our classifier.
from sklearn.feature_extraction.text import CountVectorizer, TfidfTransformer

tf_idf = Pipeline([("vect", CountVectorizer()), ("tfidf", TfidfTransformer())])

model = Pipeline(
    [
        (
            "union",
            FeatureUnion(
                transformer_list=[("bert", bert_transformer), ("tf_idf", tf_idf)]
            ),
        ),
        ("classifier", classifier),
    ]
)
What I love about using pipelines is they are so flexible and I can create these nice malleable components that fit together so easily. For now and all eternity we can add BERT features to any Sci-kit Learn model with a single line of code!
Results
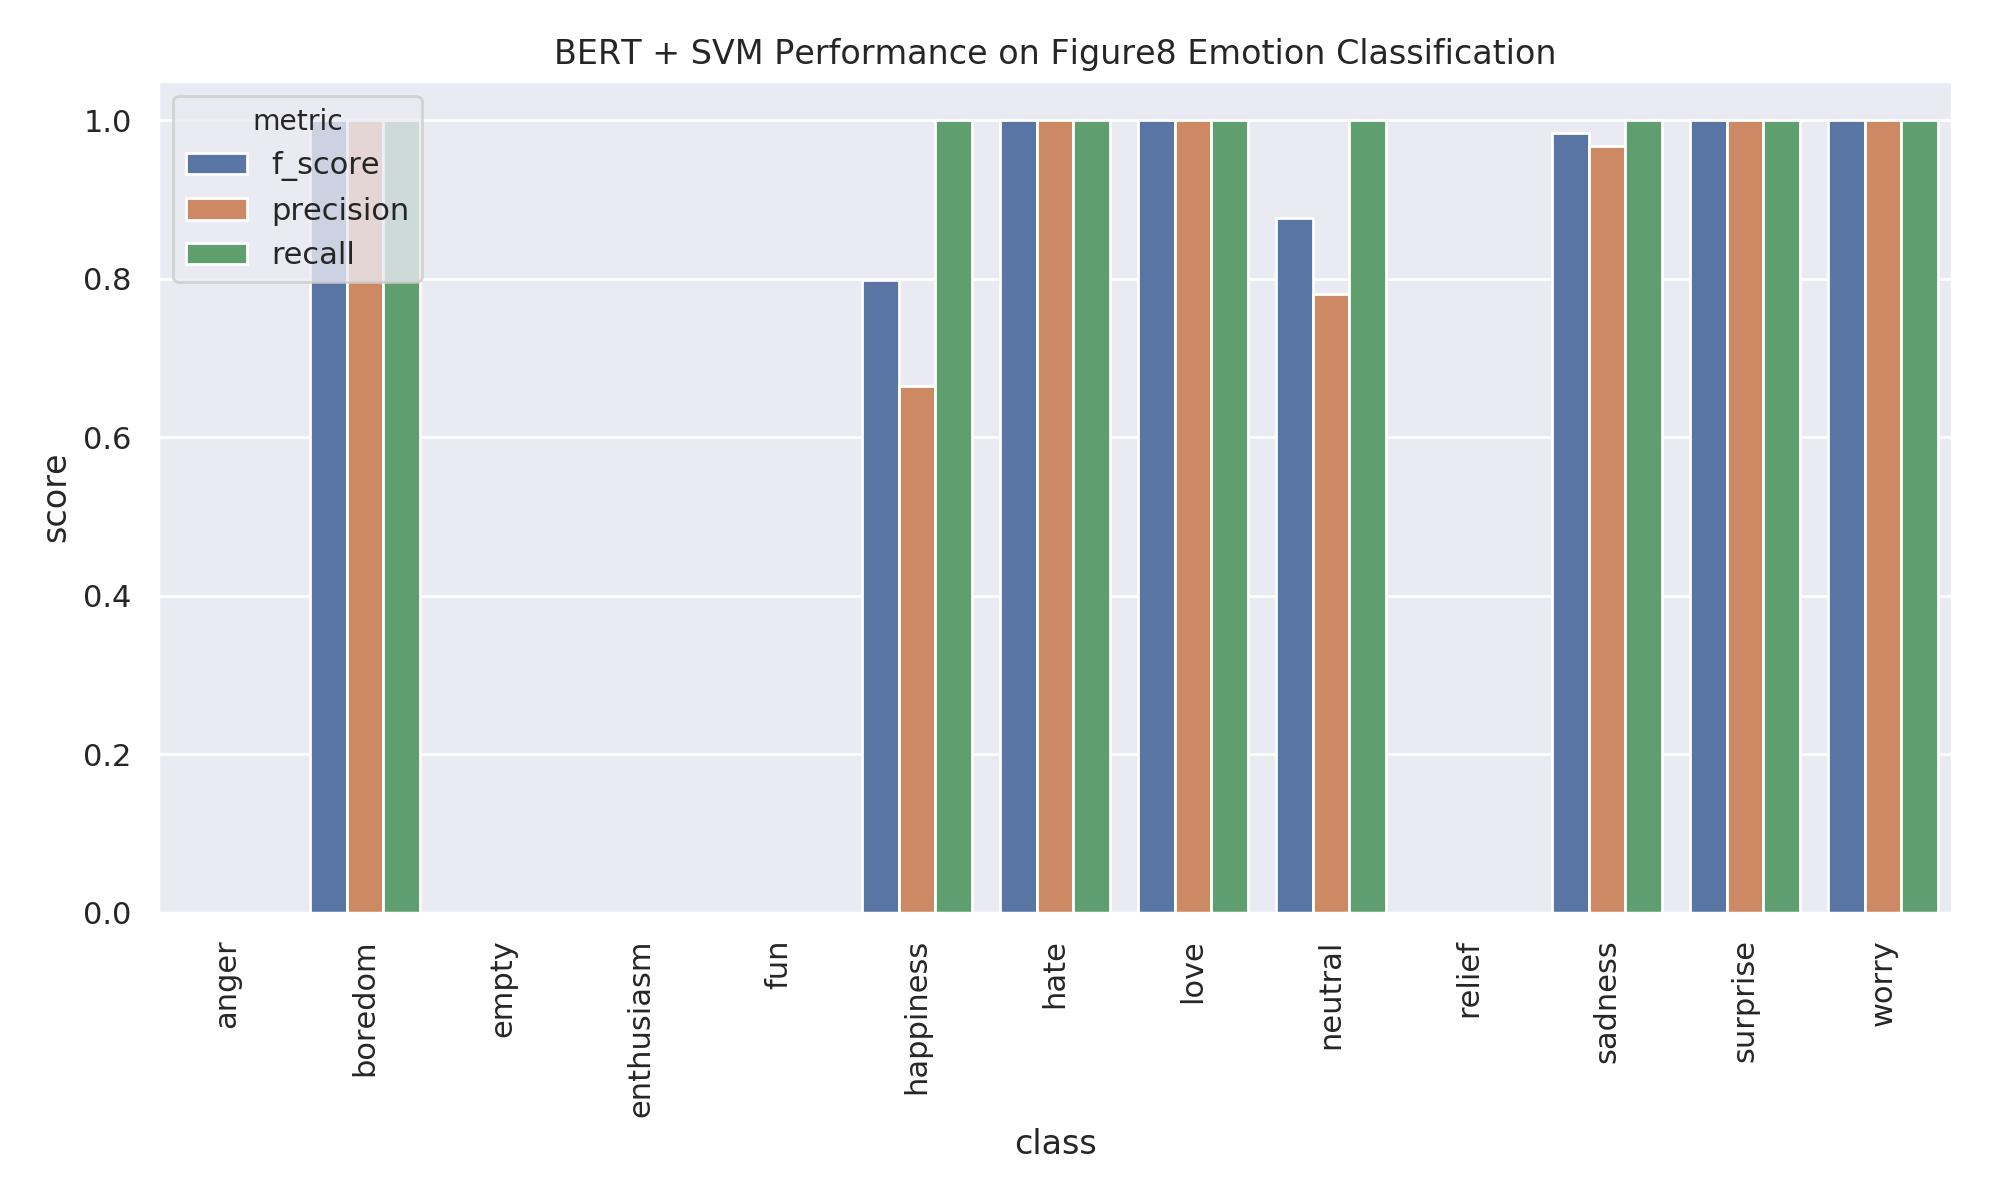
After running the above model we get pretty good results out of the box on our validation set. Some of the classes do terribly, but most do beyond amazing. Take a look. There is almost perfect classification on our validation set for a number of classes. This model only uses the CLS embedding from the BERT transformer and an SVM and it gets almost perfect predictions across all of the major labels! That’s pretty bananas.

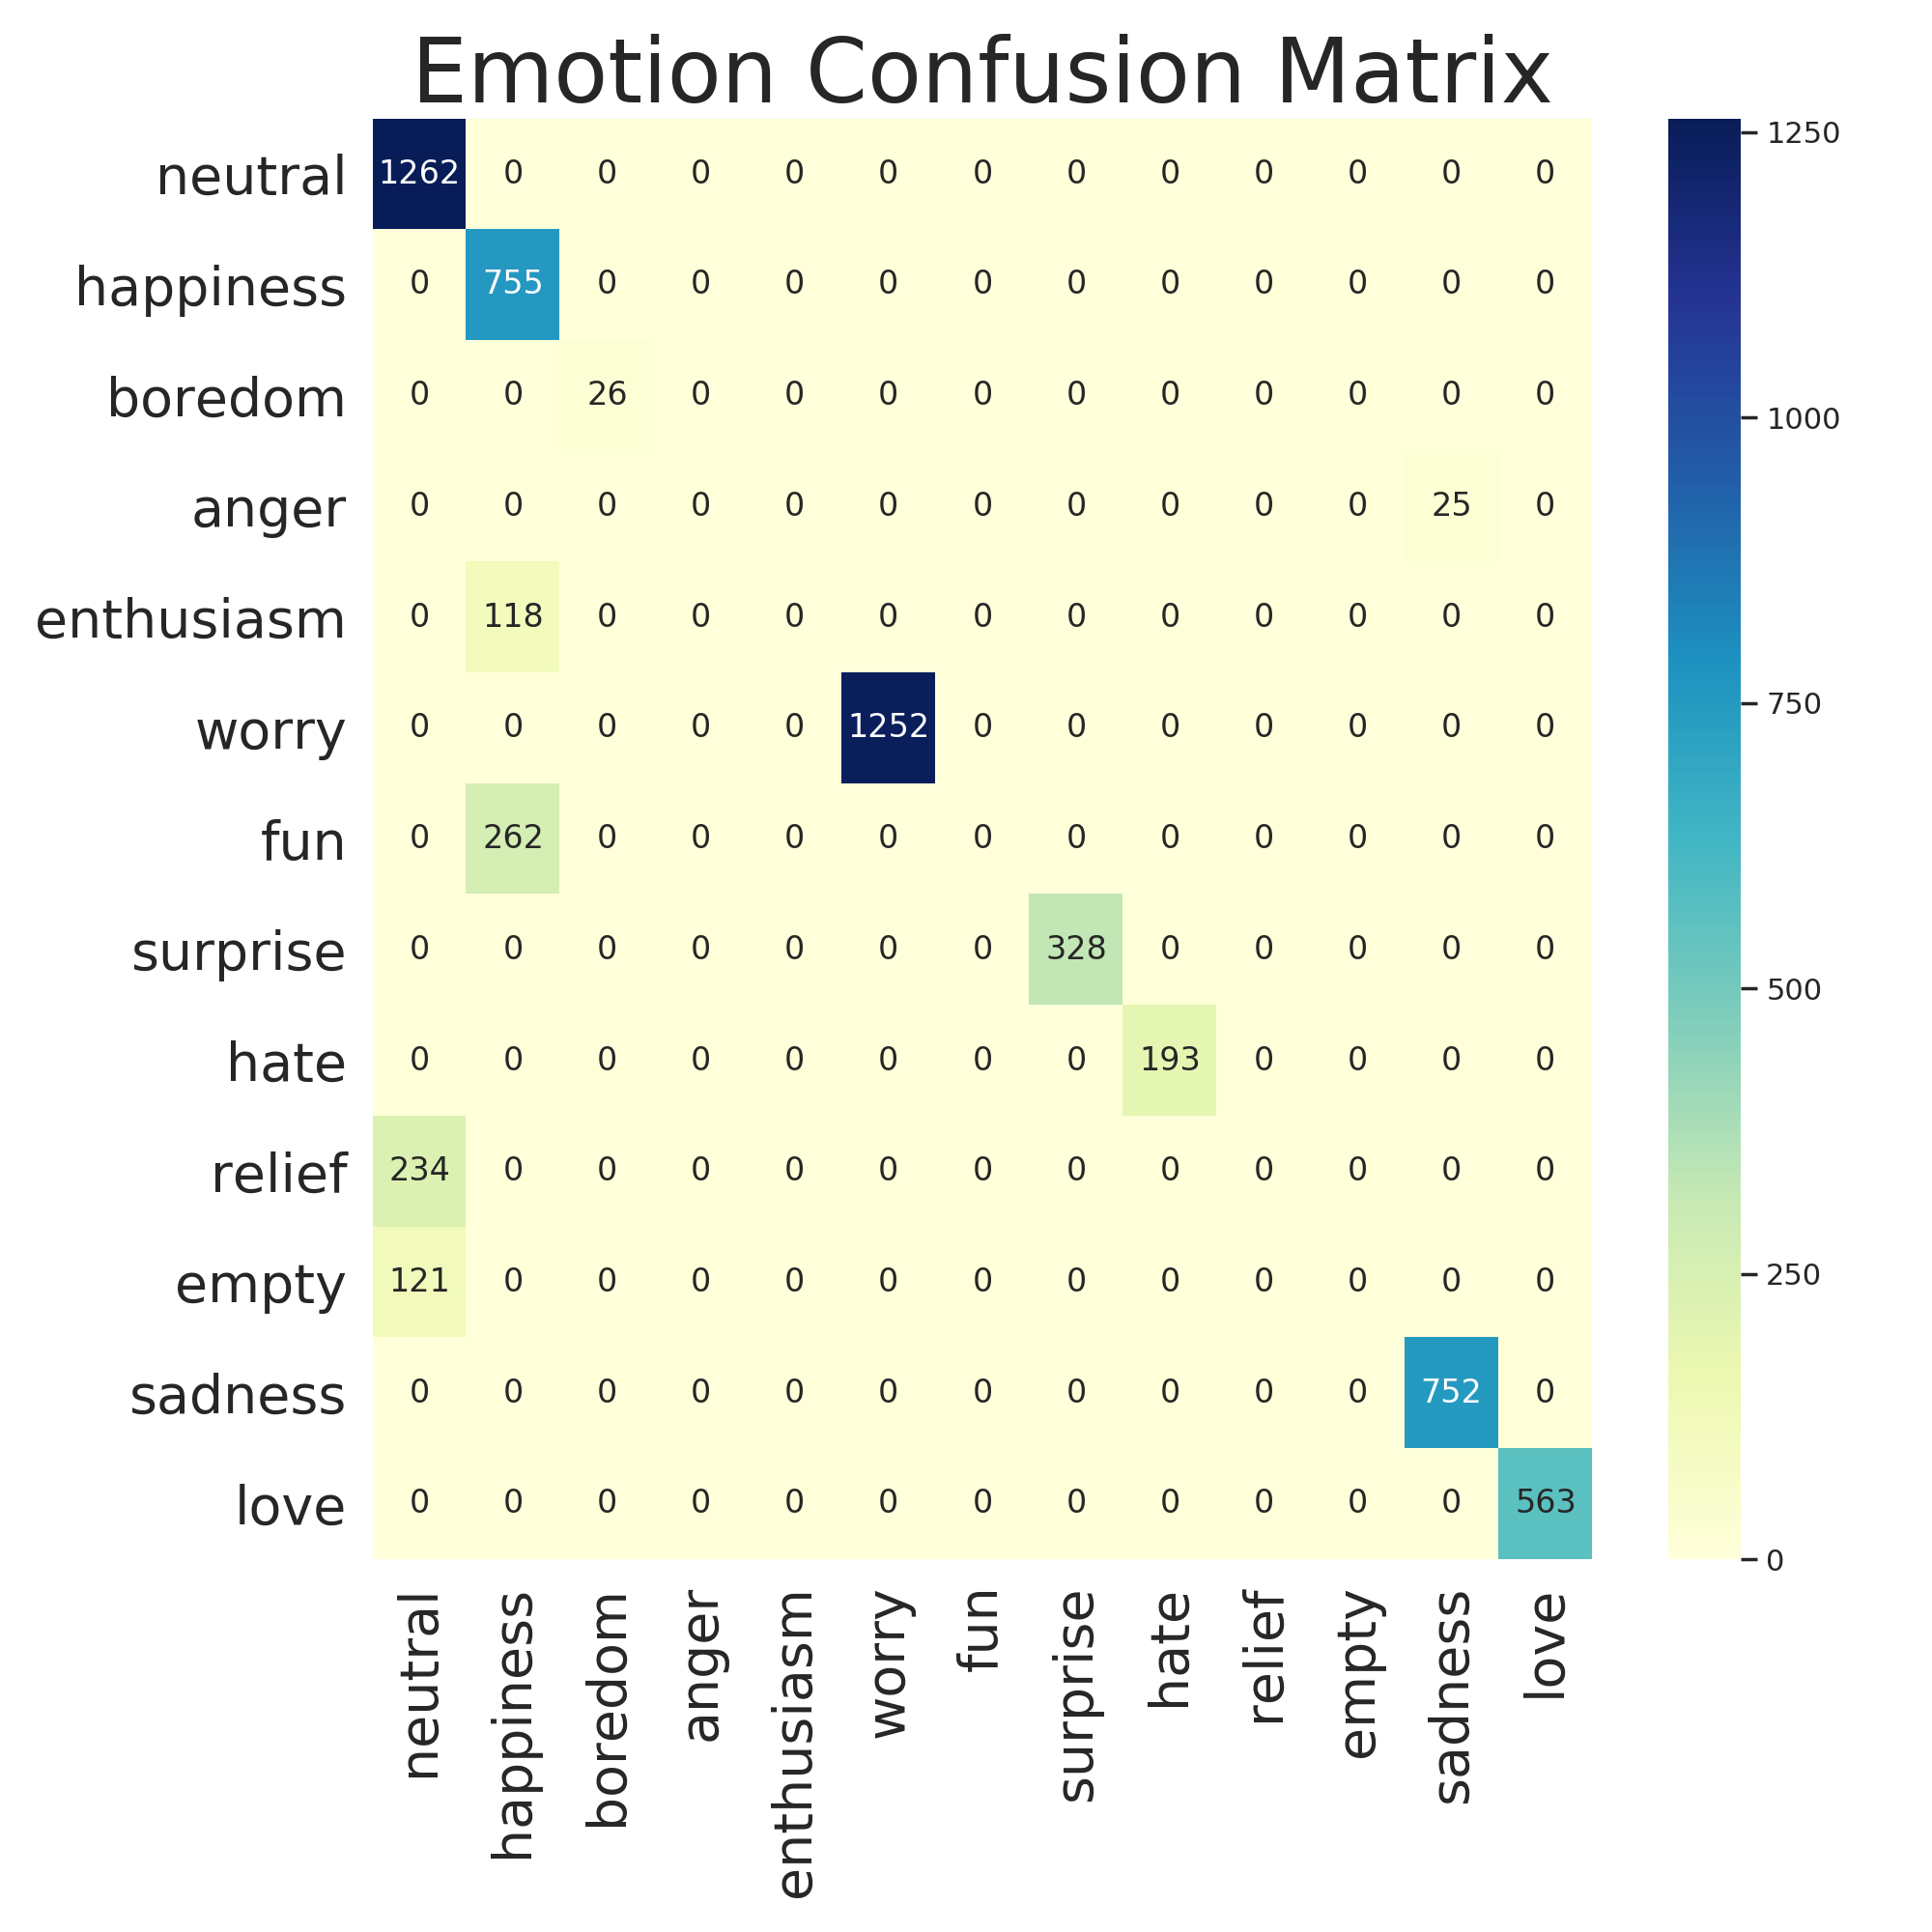
These results were surprisingly good so I took a look at the confusion matrix and it seems like enthusiasm and fun are both being classified as happiness which I’m 100% okay with. It looks like the real problem children are empty and relief but if I’m being perfectly honest I don’t even know what those emotions are 🤷♂ so I’m going to mark this as a success.

Conclusion
Sci-kit Learn transformers are super convenient. Now we can easily plug BERT based features into any Sci-kit Learn model we want! It’s just a matter of defining our BERT model and adding it as a featurization step to a pipeline. Sci-kit Learn takes care of the rest. Try incorporating these features into one of your old models and see if it improves performance. It did for me.